How do I create a new custom form and turn it into a project?
The Custom Forms add-on component lets you build your own forms to track any type of specialized assistance your program provides to its clients. Form design is very flexible to account for the myriad of specialized assistance that outreach programs provide. For example, you can design an activity form to track counseling as it relates to environmental grants, or local tourism, or homeland security, or SBIR awards. It is important to note that all custom forms must be associated with a client record. In other words, any activity record type that you create, has to tie back to a client record.
Note: The custom forms module does not come standard with Neoserra. It is an add-on module available for purchase. If purchased, then you will also have the ability to turn a form into a "Project." In this FAQ we will discuss how to create Project. For more information about creating standard custom forms, please refer to this FAQ.
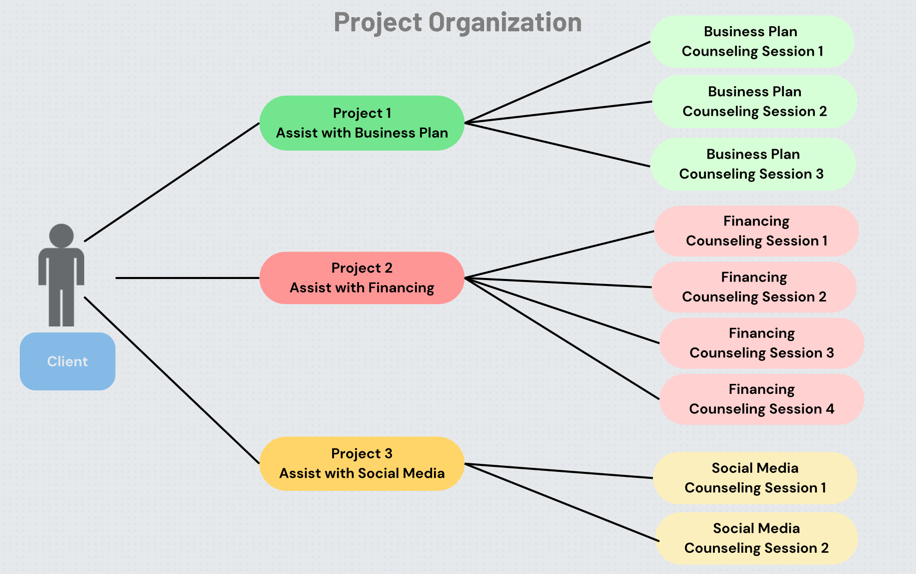
Projects are designed to organize counseling sessions. For example, you may be helping a client write a business plan while at the same time helping them obtain financing. By creating two projects, one for writing the business plan and one for financing you can track how much time you spend on each task.
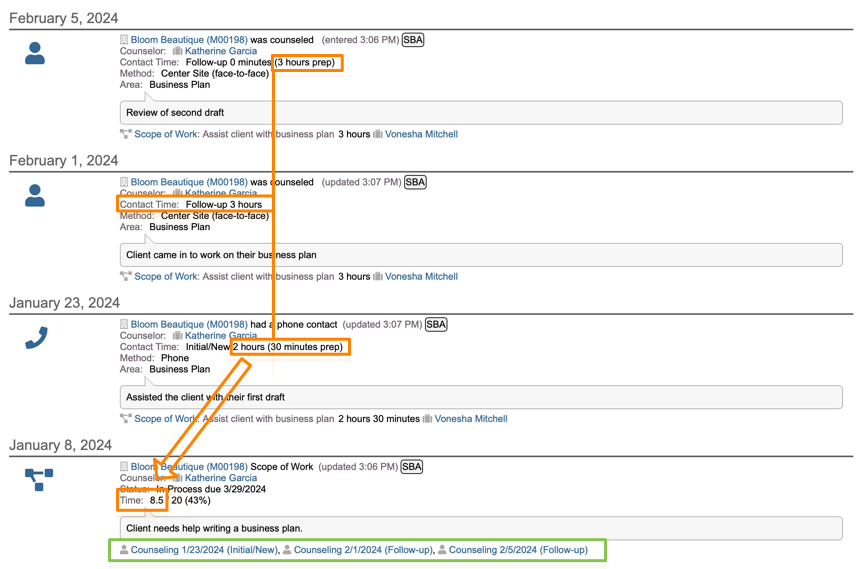
Each project has its own associated counseling sessions. Essentially a project helps you organize and group counseling sessions together. In the example below, we see that one client has three projects assigned to them. Each project has its own associated counseling sessions, thus allowing you to track time per project and track completion by project:
Furthermore, projects can have associated "Actions". For example, once you have completed your efforts with the client on the business plan, and you set the project to "Completed" then an email message can be automatically triggered to notify the appropriate parties of the completion. In other words, projects offer some additional organizational benefits, not offered with a standard custom form. However, sometimes this additional level of organization simply isn't needed. Thus, you decide which form is a standard custom form, and which form should be defined as a project.
Creating a "project" is the same as creating a standard custom form as discussed here, which is why we will only highlight the specific properties of a project in this FAQ:
- Establishing basic properties for a project
- Adding fields to your project
- Creating action items
- Customizing the summary listing
- Linking counseling to a project
- Adding duplicate check
- Editing fields
- Inactivating a project
- Configuration settings
Establishing Basic Properties for a Project
New projects are created under the Administration|Configuration menu of Neoserra and only administrators will have access to this functionality. Click "Custom Forms" from the Configuration menu. You can either convert an existing form to a project, or you can click New to create a new form and start it off as a project:
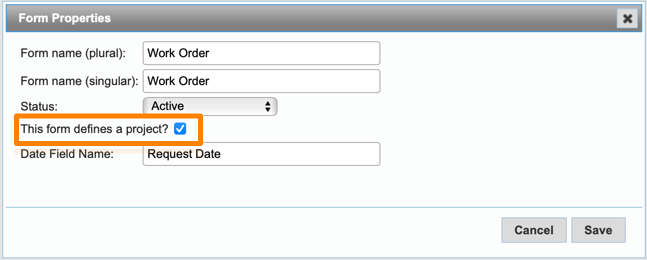
Simply check the "This form defines a project" to convert your form to a project. Complete the fields as appropriate. Initially, you'll likely want to start your project with a status of either "Inactive (read-only)" or "Restricted (admin-only)".
The read-only status displays the custom form in the general Neoserra interface so that you can access it as you're creating it to see how it's coming along, but users cannot create any records while you're still working out the details. Alternatively, the admin-only status doesn't even allow users to see the records, thus allowing you to test it without anyone even knowing about the form.
Then, once you've completed the form, you'll want to switch it to "Active" so that users can begin entering records for the form. Take note that editing a form after users have started to create records may create havoc with your data. For example, if you initially created a field with a format type of Yes/No and then you change the field to track the actual date, then any existing records in the database will be garbled because Yes/No information cannot be displayed as a date. Similarly, if you delete fields/add fields after records have already been created then your older records may be inconsistent with the newer records. And any reports/scorecards that were already created based upon previous versions of the form will all need to be updated.
Adding Fields to Your Project
Once you click to save your new Project, will see a number of additional fields not normally included on the custom form:
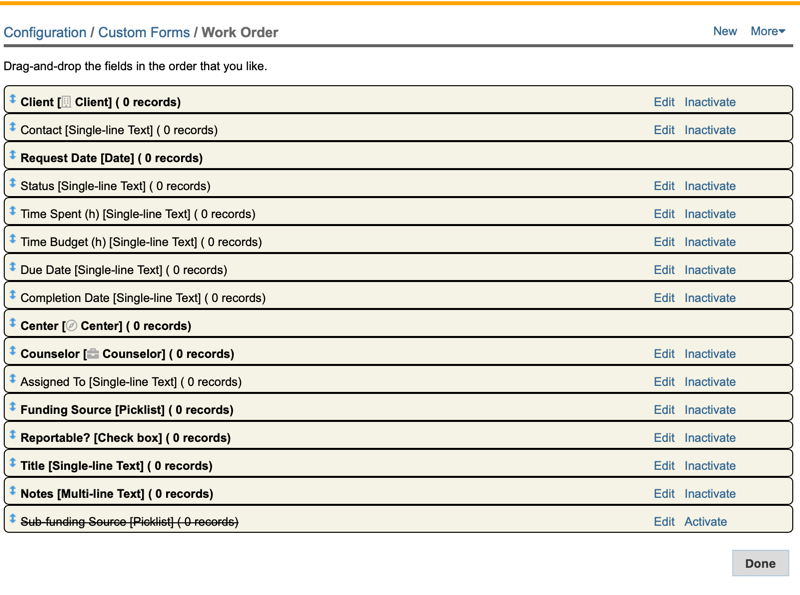
Most fields can be activated/inactivated based upon your needs, and they may be set to mandatory (as indicated by the bold font), or made optional; however, there are a number of fields that are critical to the functionality of the project. For example, the project logic is based upon the built-in status field and this field should not be disabled. Also, the status field is used for all actions that notify users of changes to the record.
Similarly, a title should always be included on the form to provide reference for the user in those cases when a client has multiple projects. And, while you can make the Client field inactive, it should be noted that this is not recommended. Custom Forms are designed to be client-centric and removing this association reduces the functionality of the form.
You cannot change the name of these system-defined fields. These are all special fields with certain built-in behavior that you are not allowed to alter. The Date and the Center fields can never be disabled and must remain mandatory on the form.
The following fields are specific to the project functionality, you can refer to the custom form documentation for the other fields that are automatically included on your form:
- Status: All projects will have the following five status option:
- New/Not Started
- In Process
- Completed
- Rejected
- Suspended
- Time Spent (h): This field will be maintained by Neoserra and cannot be edited by the user. This field will display the cumulative counseling session time that is associated with this project.
- Time Budgets (h): This field is designed to track the time budgeted for a particular project.
- Due Date: If your project has a due date, then you can use this field for tracking the expected completion date.
- Completion Date: The actual completion date can be entered in this field. The field is automatically set to "today" when the project status is set to "Completed."
- Assigned to: If the projects are entered by one counselor, but expected to be performed by another counselor then you can select the counselor to whom the project is assigned in this field. Using the project "Actions" discussed below, you can automatically notify the assigned counselor when a new project is entered into the system.
- Title: A title is mandatory for all projects to know which project to assign a counseling session to.
Next, you will want to add your own fields to your custom form. To add a new field click the "New" link in the upper right corner of the screen. When you've completed all the settings for your field, click the Save button. Neoserra places your new field as the last field. Continue to add as many fields as desired to the form. Once you have added all the fields to the form that you want to track, you can reorder them by dragging them up or down within the Neoserra Custom Forms interface. Click the Done button once you have added and organized all the fields that you want to include on this form.
Creating Action Items
Once a form has been turned into a project, you will notice the option to create "Actions" associated with the project:
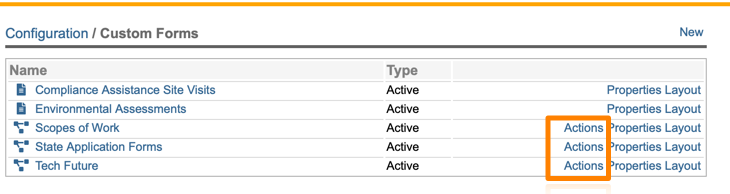
Custom forms that are not projects, will not have this option. The "Actions" link allows you to set up an email template that is triggered based upon a change in the project status:
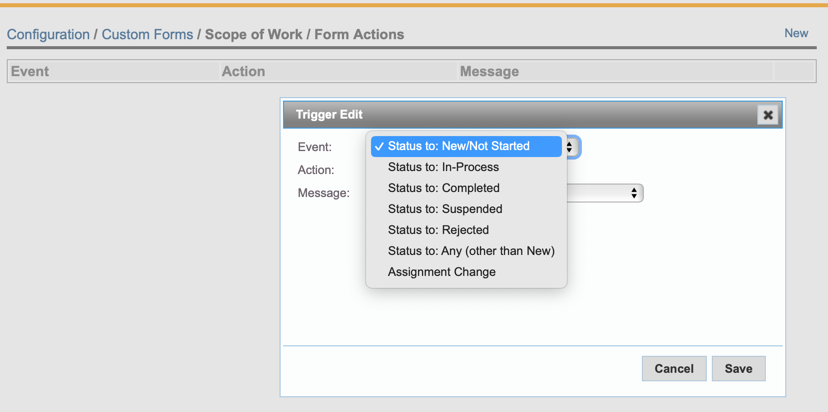
Thus, when a new project is entered into the system, and email message can be automatically sent to the appropriate party. Similarly, if a project is set to "Completed" an different email message can be sent.
If your project includes some user-defined fields that you want to include in the email messages that are triggered automatically, then you will note the specific user-defined field substitution variable on the field within the project configuration:
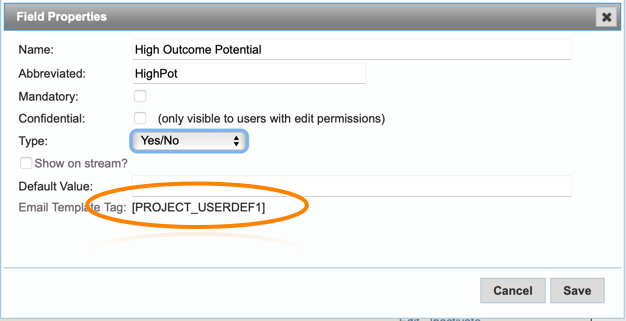
These substitution variables are not shown within the email template interface which means you will need to carefully copy them over if you want to use them in your triggered email messages. Also, it should be noted that you will need to create custom email templates for each project if user-defined substituion variables are used, because each project has its own "USERDEF1" variable and "USERDEF2" variable, etc. and USERDEF1 may be a different field/variable on one project vs. another.
Customizing the Summary Listing
Once you've added all fields saved them, you can go back into the form's properties to activate your new form (highlighted in green below):
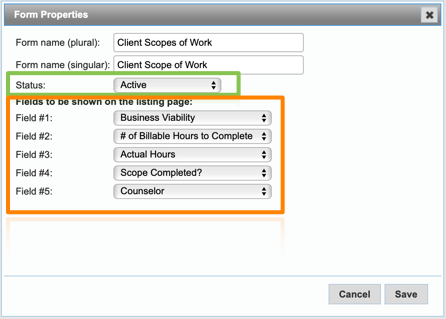
Next, choose which of your newly created fields will appear as additional columns on the summary listing page in Neoserra (highlighted in orange). By default, Neoserra will always show the date and the status of the project. Assuming that you didn't inactivate the client and/or counselor fields, then the client/counselor will also be included in the summary listing along with the funding source, which leaves you five additional columns to customize.
Assuming you have changed the status of the form to "Active" then your users can now start to create new records using your custom form. Since custom forms are categorized as client activity forms, a user's permissions in the "Client Activity (Sessions, Awards, etc.)" database area directly determines their level of access to custom forms.
Note: To report on the data in your custom forms, you can create custom reports. Again, keep in mind that if you edit the form after creating reports/scorecards, then you may also need to edit your report/scorecard to align with the changes made on the form.
Linking Counseling to a Project
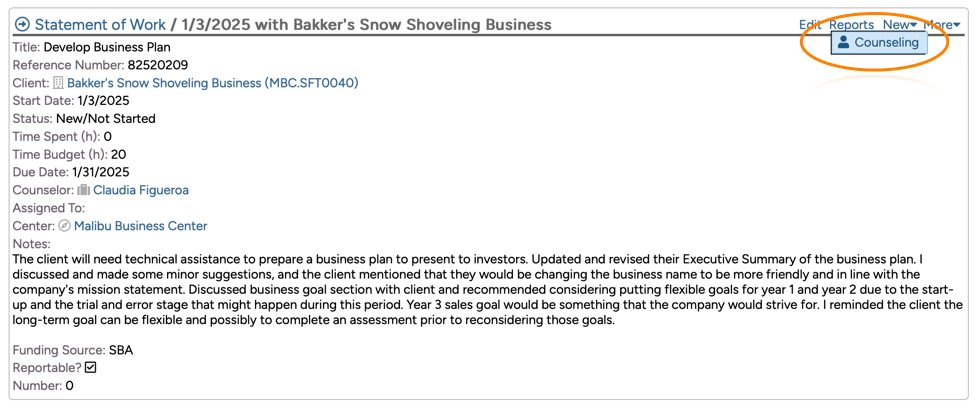
Once a project has been created for a client, then you can either create an associated counseling session directly from the project record:

NOTE: The configuration settings will determine who will see the prompt.
If you say "Yes" to the prompt, or if you create a counseling session directly from the project record, then Neoserra will take the associated counseling session time and add it to the "Time Spent" field within the project. The Time Spent field is a system-maintained field that Neoserra updates based upon those counseling sessions associated with the project. If the Time Budgeted field has been completed then Neoserra will show the percentage towards completion as you can see below, where three sessions were association with one project:
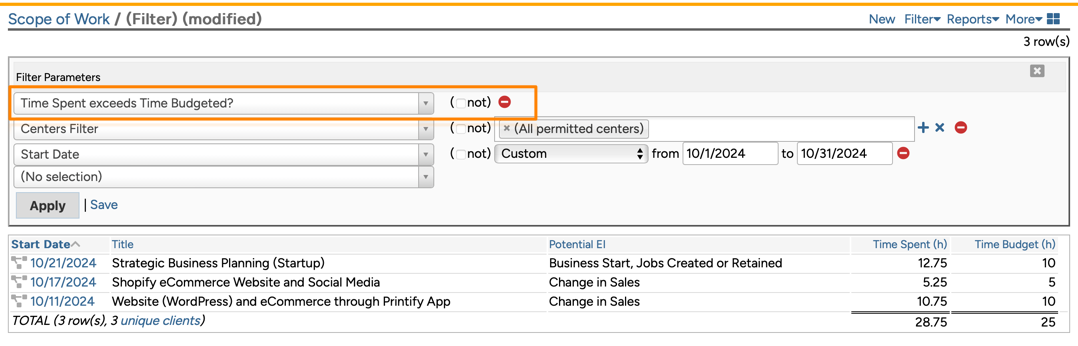
There is a special "Action Item" that tracks when the time spent exceeds the budgeted time, and Neoserra also offers a custom filter to track projects that have exceeded their budgeted time:
Once a project has been set to completion then the prompt to associate future sessions with the project will no longer appear.
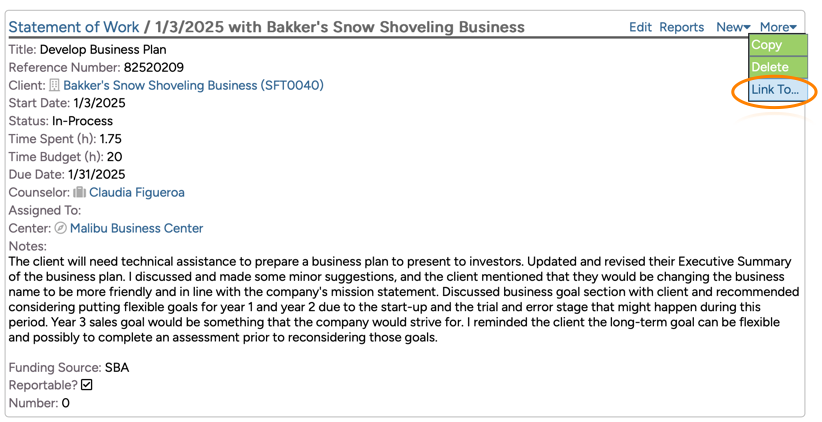
If you inadvertently add a counseling session to a project and you didn't mean to, then you can unlink it from within the project record under the More|Link to menu:
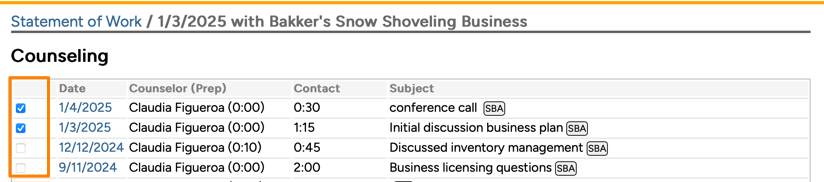
This lets you both link counseling sessions to a project and unlink counseling sessions from a project. In the screenshot below, you will see that the first two sessions are already linked to the project. You can uncheck a session and the time spent will automatically be deducted from the project. Alternatively, you can also check any additional sessions that should have been linked to the project and the time associated with those sessions will be added:
Finding sessions missing their linkage
It can happen that a user forgets to link a session to a project. How will you find those sessions that do not have a linkage to a project, but probably should? You can used the "Is connect to a project" filter:
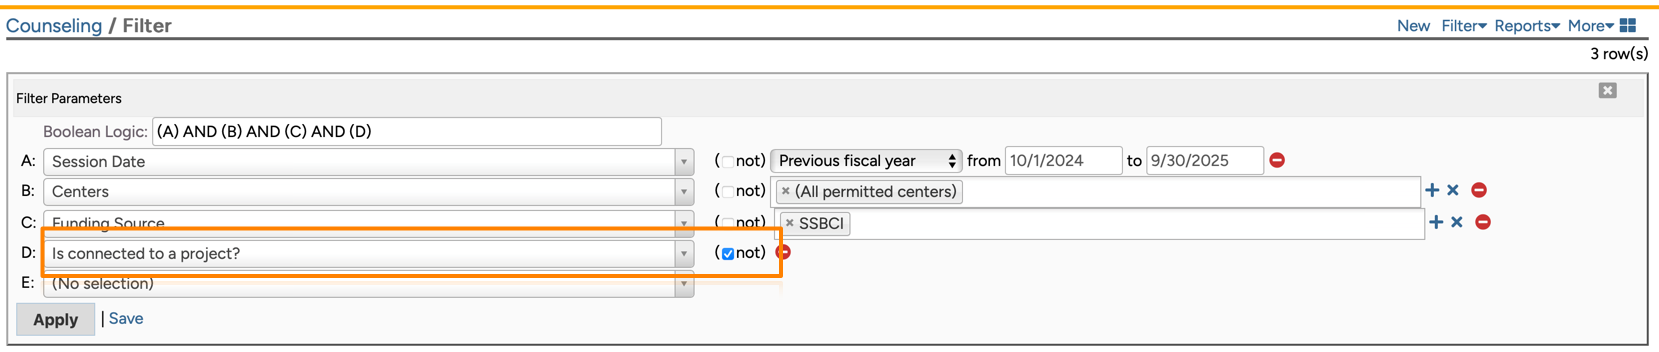
In this case, the filter is looking for all SSBCI sessions that are NOT associated with a project.
Adding Duplicate Check
Depending upon the type of form that you have created, you may want to enable the Neoserra Searchlight duplicate warning functionality. The Searchlight functionality allows you to specify a field on your form that is used to help identify duplicate records as discussed here. It is important to realize that while the Searchlight feature highlights potential duplicate records, it does not prevent the user from creating duplicate records.
Editing Fields
You can edit or inactivate the individual fields found on a custom form from the same interface in which they were created. To edit/inactivate a field found on a custom form, follow the next set of steps:
- In Neoserra, select Administration|Configuration to open the global configurations interface (only Neoserra database administrators have the necessary permissions to access the Configuration menu).
- From the Configuration menu, click "Custom Forms."
- In the "Name" column, click the name of the custom form that uses the field you would like to edit.
- From the list of fields, find the field that you want to edit and click the corresponding "Edit" or "Inactivate" hyperlink that displays to the right.
Important: Be very careful about editing fields in such a way that you change their intentions. For example, if you edit the name of a yes/no field from "Out of State?" to "In State?", then all values entered before the edit will read the exact opposite of what was intended when the field was originally completed. If you think your edit could cause a disconnect with values previously entered into this field, then, as a general rule, we recommend inactivating the field and creating a new one (rather than editing it) to preserve historical data.
Important: OutreachSystems recommends that you never edit or delete a previously-created picklist or multi-select choice. If you feel that you must, please contact us first so we can explain the ramifications of doing this.
Note: If attempting to edit one of the default fields that are automatically included with each custom form, you have very limited options. All you can do is toggle their mandatory or visible status. If you are attempting to edit a field that doesn't even display an "Edit" hyperlink, then you are looking at one of the three fields that must be included (and mandatory) on every single custom form and there is no way for you to edit it.
Inactivating a Project
If, down the road, you ever decide that the project is no longer useful or relevant for your program, you have the option to inactivate it. There are two inactive statuses available:
- Inactive (read only). If you inactivate it using the "Inactive (read only)" status, users are still able to easily view and access previously-created records, but cannot create any new records.
- Inactive (invisible). If you inactivate the form using the "Inactive (invisible)" status, then the form title disappears from Neoserra' left-hand menu altogether and you are no longer able to access any summary views of the records created for this form. The records are not permanently gone; they can still be subsetted on and even viewed from a client's History of Activity tab. Also, if you ever wanted to report on the records in the future, you could temporarily change the form to read-only inactive status to bring back the summary view.
Configuration Settings
There are two global configuration settings to be aware of that govern the functionality of all projects created. The Administration|Configuration|General Settings page has the following two configuration settings:
Both of these global settings affect the functionality of this prompt when entering in a counseling session:
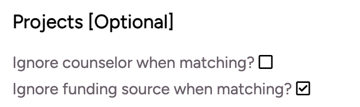
- Ignore counselor when matching?: By default, this first checkbox is always unchecked, which means that when counselor A creates a project and assigns it to themselves, then counselor B will NOT see the prompt to associate a counseling session with the project. Checking this box means that all counselors will be prompted to associate their counseling sessions with the project, regardless of whether they were the counselor who created the project or who is assigned to the project.
- Ignore funding source when matching?: By default, this second checkbox is always checked, which means that when a project is created with one funding source and a couseling session is created with another funding source, the user will nonetheless see the prompt. Again, unchecking this box, means that the funding source for the project and the funding source of the counseling session must match.
Want more? Browse our extensive list of Neoserra FAQs.