How can I create a custom report, and share it with my friends?
Neoserra has more than 100 built-in reports. And even though they offer many options and do a great job of helping you organize your data, there may be times when you need to organize data in a way that Neoserra doesn't support. For example, you may love the built-in client address list report, but just wish that it was sorted a little bit differently, or included that ONE extra field—and then it would be exactly what you need.
That's where custom reports come in. Whether you want to make minor changes to an existing Neoserra report or create a brand new report that doesn’t resemble anything currently in Neoserra, you can do so using the custom report module. When designing your custom report, you get to determine what data will be included in the report. You also get to determine every aspect of report layout including sort order and column header names.
Custom reports can be designed for all record types. Neoserra's custom report module is very powerful, but there are some limitations, as outlined next:
- No custom calculations. You cannot apply custom calculations to column totals. For example, you cannot specify that Neoserra provide you with the average number of counseling hours for a grouping of records. Nor, for example, can you ask Neoserra to report how many of the those counseling sessions were held at the client's site and how many were held at the center's site. Neoserra, by default, does have intelligent totaling capabilities that it will apply (e.g. total hours of counseling contact time or total value of awards), but they vary from field to field and cannot be influenced by the person designing the custom report.
- Primary contacts only. When creating a custom client or client activity report, you can only include information for the client's primary contact. Any other contacts listed for a client record cannot be included.
- No record restricting capabilities. Custom reports, like the majority of built-in reports, do not have the ability to narrow the group of records you are reporting on based upon a characteristic they have in common (e.g. all woman-owned businesses or counseling sessions that have at least 60 minutes of travel time). If you want to restrict a custom report's output in this way, you must first create a filter and then run a built-in or custom report against that grouping of records.
Getting Started
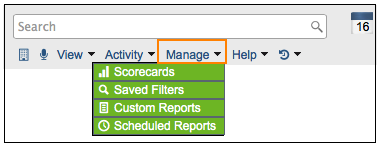
All custom reports are accessed from the Manage|Custom Reports menu option:
To create a new custom report, follow these steps:
- Choose the type of custom report that you want to create.
- Click the New link in the upper right hand corner to open the custom reporting interface.
- Assign a name to your report.
- Custom reports created by you are, by default, only available to you. If you feel you want to share your report with the other users in your center, or potentially with everyone in the network, you can do so using the Available to field. If your user account is set up with full administrator privileges, you'll be able to see and manage all custom reports created by all users; not just those you created.
- Neoserra allows you to group records together for easier organization. When you decide to group your report, you will automatically get summary counts of each group. The following custom report is grouped by "City" which automatically provides for totals by city on the report:
As you can see, the report above, still provides line item details. If you only want to see the summary data, then you can select the Summary only checkbox, which produces the following report:
In addition to grouping records, you can also set primary, secondary, and even tertiary sort orders at the bottom of the screen for the records that display in your custom report output. These sort orders can be used regardless of whether a record grouping is established.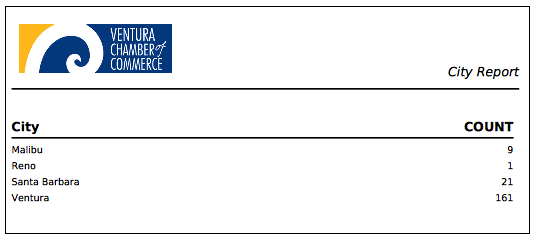
- Now you will need to decide which fields you want included in your custom report. Click Add a new row to open the drop down selection interface. The drop down selections are different for each report type and include all the fields available for inclusion on your specific report type report. You can start typing the first few letters of a field name and all relevant matches will appear:
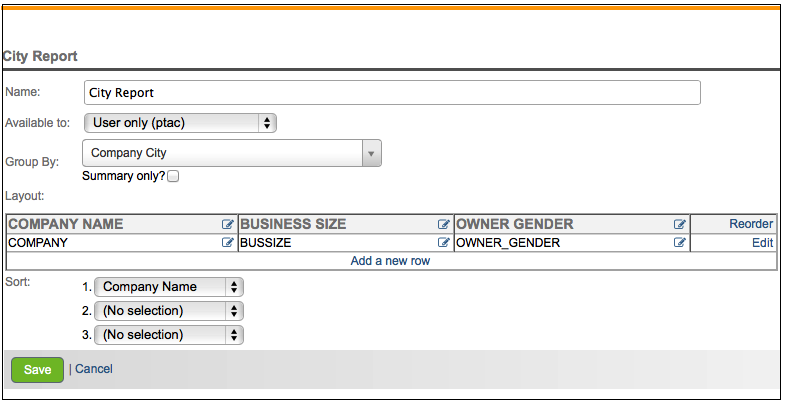
You are initially provided with up to 10 columns, but if you need more, simply save your first ten columns, and then open the interface again to get ten more. When you have added all your fields click Save to see the rough layout of your report: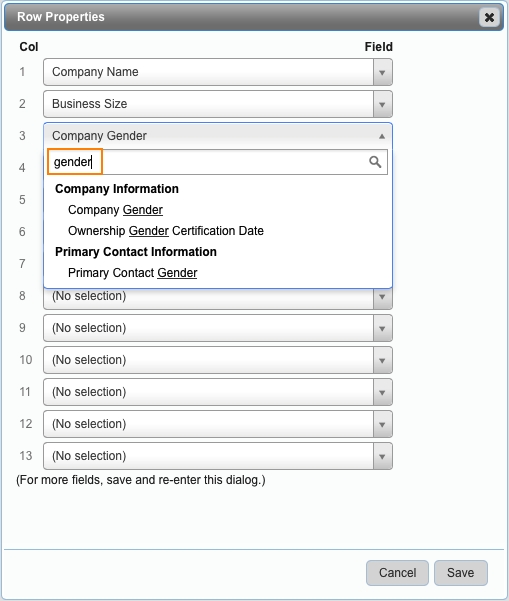
Editing Columns
The fields you selected are listed in the order that you chose them from the drop down. To change the order, click the Reorder link and use the up/down arrow icons to move each field to its desired position in the report output. When the fields are ordered to your satisfaction, click the Save button.
Every field that you select for inclusion in your custom report has a default column header associated with it. You can leave these default column header names in place or you can edit one or more of them. To edit a column header, click the Edit icon next to the header name:

You will notice an icon next to the column header and the same icon next to the field value. For purposes of editing the header use the icon highlighted in orange. Click the icon and change the label. If the value you are entering is lengthy and you don't want it to take up so much horizontal space, you can force a break in the header by adding a "\n" where the break should be, as shown in the next graphic

To bold, italicize or underline a field, you can click the icon highlighted with a green circle above, next to the field value.
Deleting Columns
To delete a column from your custom report, click the Edit link to the right of the row. This opens the drop down interface again. Simply go to the field you want to delete and change the value to: (No Selection). Save your change and then click to Save your report.
Running Your Custom Report
Your custom report has been created and you are ready to run your report. Make sure you Save your report and then proceed to view the data type for which you created a report. In other words, if you created a client report then go to View|Clients; If you created a counseling session report then go to Acvitity|Counseling; etc.
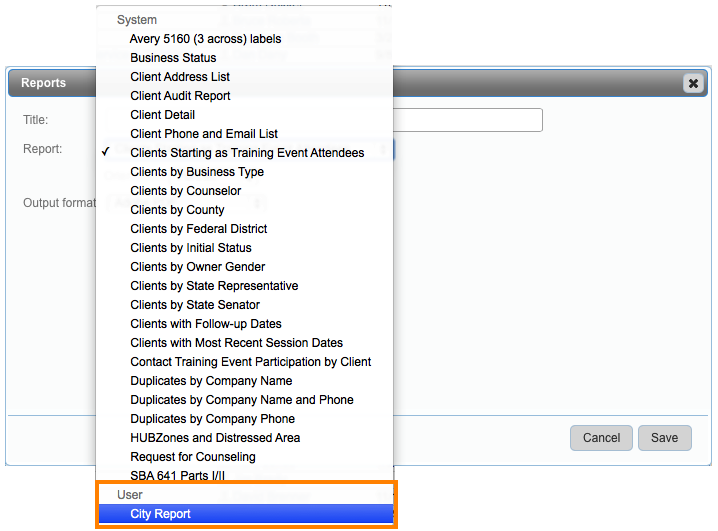
Create a filter if you want to run your report on a certain grouping of records. With the records you want to report on, on the screen, click Reports from the top right hand side of the screen and choose your custom report from the bottom of the drop down. All custom reports will be listed together below the system defined reports.
Deleting Custom Reports
You can only delete reports that you have created. Only administrators can delete custom reports that do not belong to them. To delete a report click Manage|Custom Reports. Click the type of report you want to delete and then find the report from the list presented. The Delete link is in the right margin.
Want more? Browse our extensive list of Neoserra FAQs.