How do I create a new standard custom form?
The Custom Forms add-on component lets you build your own forms to track any type of specialized assistance your program provides to its clients. Form design is very flexible to account for the myriad of specialized assistance that outreach programs provide. For example, you can design an activity form to track counseling as it relates to environmental grants, or local tourism, or homeland security, or SBIR awards. It is important to note that all custom forms must be associated with a client record. In other words, any activity record type that you create, has to tie back to a client record.
Note: The custom forms module does not come standard with Neoserra. It is an add-on module available for purchase. If purchased, then you will also have the ability to turn a form into a "Project." In this FAQ we will discuss a standard Custom Form that is not a Project. For more information about turning a custom form into a Project, please refer to this FAQ.
Your custom activity form can consist of as many fields as you desire. You decide the data format of these fields, their names, and their order. The only requirements are that the forms must represent client activity (i.e. they must be able to be associated with client records) and must carry a couple of basic data fields necessary for database integrity.
The following sections describe the process of creating and editing custom forms in detail:
- Establishing basic properties for a new custom form (without a Project)
- Adding fields to your new custom form
- Customizing the form's record summary listing
- Editing the fields on an existing custom form
- Inactivating a custom form
- Using Searchlight to identify duplicates
- Converting a custom form into a project
Establishing Basic Properties for a New Custom Form (without a Project)
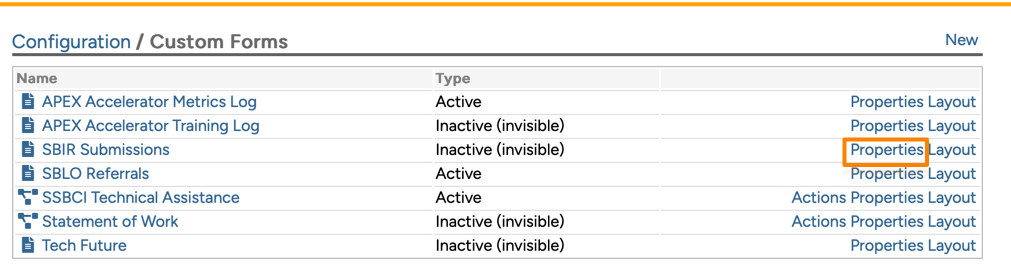
New forms are created under the Configuration menu of Neoserra and only administrators will have access to this functionality. Click "Custom Forms" from the Configuration menu. Then, with the Custom Forms interface open, click the "New" hyperlink, which is located in the upper right corner, as highlighted in the next graphic.
Form Name
From the Forms Properties screen, you are asked to provide singular and plural versions of your form name. For example:
- Plural: Scopes of Work
- Singular: Scope of Work
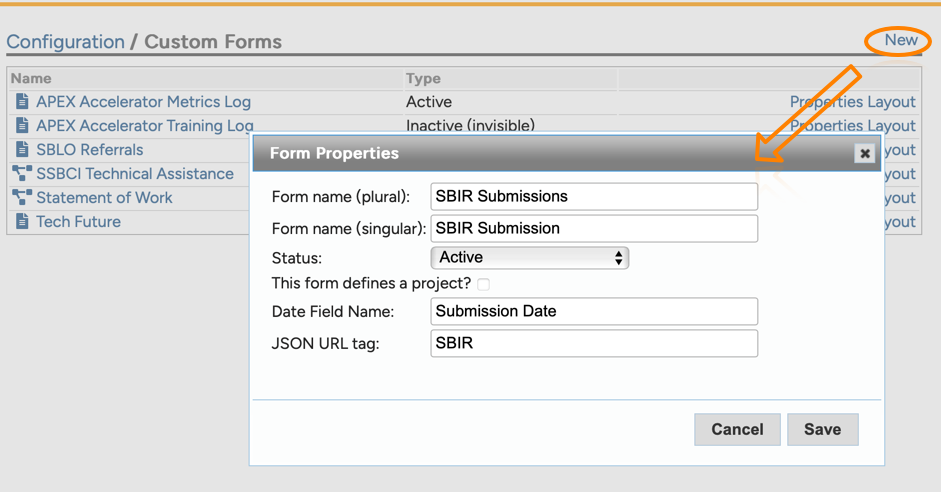
Status
Additionally, you will need to set the status of the form. You can choose from:
- Active
- Inactive (read-only)
- Inactive (invisible)
- Restricted (Admin only)
Initially, you'll likely want to start out with either the "Inactive (read-only)" status of the "Restricted (Admin only)" status. The "Inactive (read-only) status is ideal while you are still building the form. It displays the custom form in the general Neoserra interface so that you can see how the form is coming along, but no one can create any records while you're still working out the details. The "Restricted (Admin only)" status allows you, as the database administrator, to create records but no one else will be able to.
Once you've completed the form, you'll want to switch it to "Active" so that users can begin entering records for the form.
Once a form has been retired and it no longer in use, then you can change the status to "Inactive (invisible)".
Project
For purposes of this FAQ, we will not change our Custom Form to a project, but you can refer to this FAQ if you want to turn your form into a project.
Date Field
All custom forms must have at least one date. But the date can be labeled anything you want. For example, you could call it the "Start Date" or, as in the example above, you can call it the "Submission Date". A date is required, but how you label that date field is up to you.
JSON URL Tag
If you are using the Neoserra RESTful JSON API module, and you intend to import data into this form from an external data source, then you can provide the tag used for this form.
Adding Fields to Your New Custom Form
Once you have established and saved your basic form properties, it will automatically open and include the following system-defined fields:
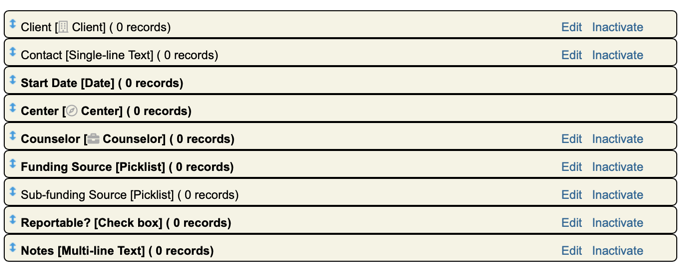
These fields may be activated/inactivated based upon your needs. In fact, the "Contact" field and the "Sub-funding source" field are initially disabled. The rest of the fields are automatically set to mandatory (as indicated by the bold font), but you may make them optional except for the Date and the Center fields, which must remain mandatory on the form. You cannot, change the name of the system-defined fields (except for the date field as per the previous step) since these are all special fields with certain built-in behavior that you are not allowed to alter.
Note:While you can make the Client field inactive, it should be noted that this is not recommended. Custom Forms are designed to be client-centric and removing this association reduces the functionality of the form.
Next, you will want to add your own fields to your custom form. To add a new field click the "New" link in the upper right corner of the screen:

Clicking "New" will present the dialog box with the following fields:
Name
In the Name field, enter a descriptive name for your new field. This name is what will display on the form.
Abbreviate
In the Abbreviated field, enter an abbreviation for the new field (up to 10 characters). The abbreviation will display in columnar reports when there is not enough room for the full description.
Mandatory
Select the Mandatory check box if you would like the field to be a mandatory field for the record type. Users will not be able to save the form if a mandatory field is not answered.
Confidential
Select the Confidential check box if you would like the field to be hidden from users with view-only permissions for the record type. In other words, a user must have a minimum of edit permissions for the client activity database area in order to edit or view the field.
JSON Tag
Put the name of the field to be used within the RESTful JSON API module
Type
From the Type field's drop-down menu, designate the type of data value that best suits the field:
- Single-line Text. This field type allows up to 250 free-form text characters.
- Multi-line Text. This field type allows up to 8000 free-form text characters.
- Decimal Number. This field type only accepts numbers that will be formatted when saved using conventional notation (100000 is saved as 100,000).
- Integer Number. This field type only accepts integers. An integer is a whole number that can be positive, negative, or zero, but it does not include fractions or decimals and the number does not include any formatting .
- Currency. This field type only accepts numbers that will be formatted as standard currency amounts (100000 is saved as $100,000.00) .
- Date. This field type requires a date value.
- Yes/No. This field type presents three radio buttons to choose from: "Yes," "No," and "(Undefined)." If you make a yes/no field type mandatory, then the value of "(Undefined)" is not allowed to remain—either "Yes" or "No" must be chosen when creating or editing a record.
- Picklist. This field type requires you to define a list of values to choose from. The list of values you create then become available from a picklist; when completing the field, only one value can be chosen.
- Multi-select. This field type also requires you to define a list of values to choose from. However, unlike the picklist field types, when completing a multi-select field, as many values as are applicable can be chosen.
- Label. This is not a field at all. Rather, it allows you to add text to organize or clarify other fields. You can also leave the label completely blank for the purpose of adding extra space between fields.
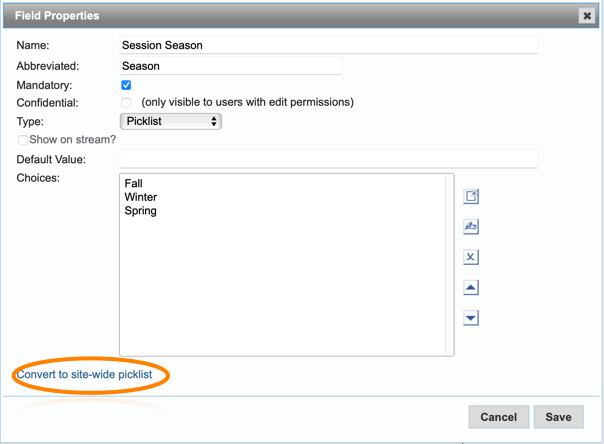
If you selected "Multi-select" or "Picklist" as your field type, then you can decide to use an existing system defined picklist, or create your own picklist that is only accessible on this form.
If you create your own picklist that will only be used on this form, then you should be aware that making changes to the picklist will be more difficult once the picklist has been used. For example, if you create a picklist with the following four choices: "High," "Good," "Moderate," and "Low" but now you want to remove "Moderate" from the list, then you will blank out the field for those records where this selection had been made. On the other hand, if the picklist were a system-wide picklist, then you have the option to disable a choice.
If you decided to create your own picklist, then you can always turn that picklist into a system-defined picklist down the road:
Creating a system-wide picklist may be beneficial if this is a drop down list that you frequently use, or if it is a list that you anticipate updating regularly. In the screenshot below, we are using a system wide picklist. In this case, the picklist is a custom created one, but it has been made into a system-wide picklist so that it can be used by multiple forms:
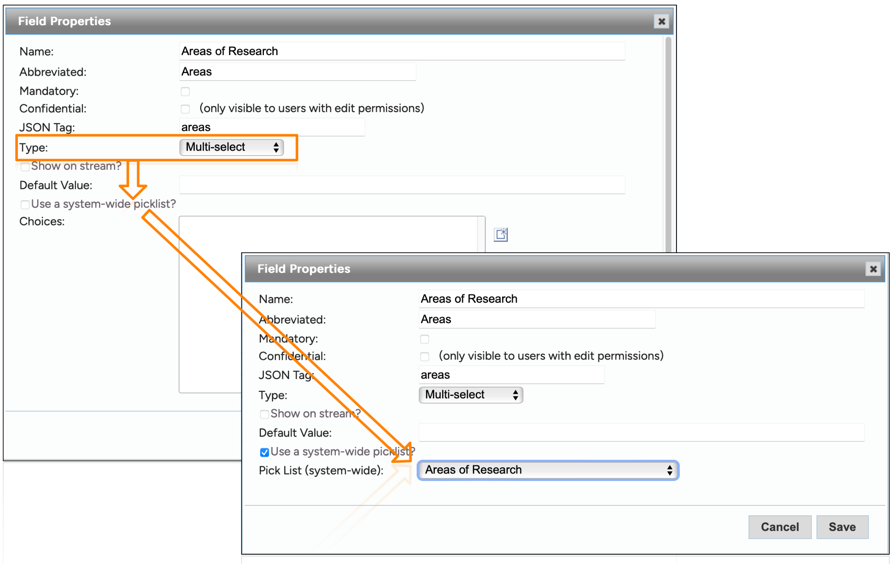
This system-wide picklist was added as a new picklist by going to Administration|Configuration and then clicking on the PickList panel and creating a "New" list.
Show on stream?
Check Show on stream? if you want the information in this field to appear in the Neoserra data stream. If you leave this box unchecked, then the data will be accessible from the custom form record, but not shown in the data stream.
Default Value
In the Default Value field, you can optionally create a default value that will initially be filled in for your field when a new record is created. If you are creating a default value for a picklist or multi-select field, be very careful to ensure that your default value exactly matches one of the values you entered in the Choices box. Setting a default value for a mandatory field does not make any sense! Be careful how you use this field.
Note: Default values are only auto-filled when creating new records, not when editing existing records.
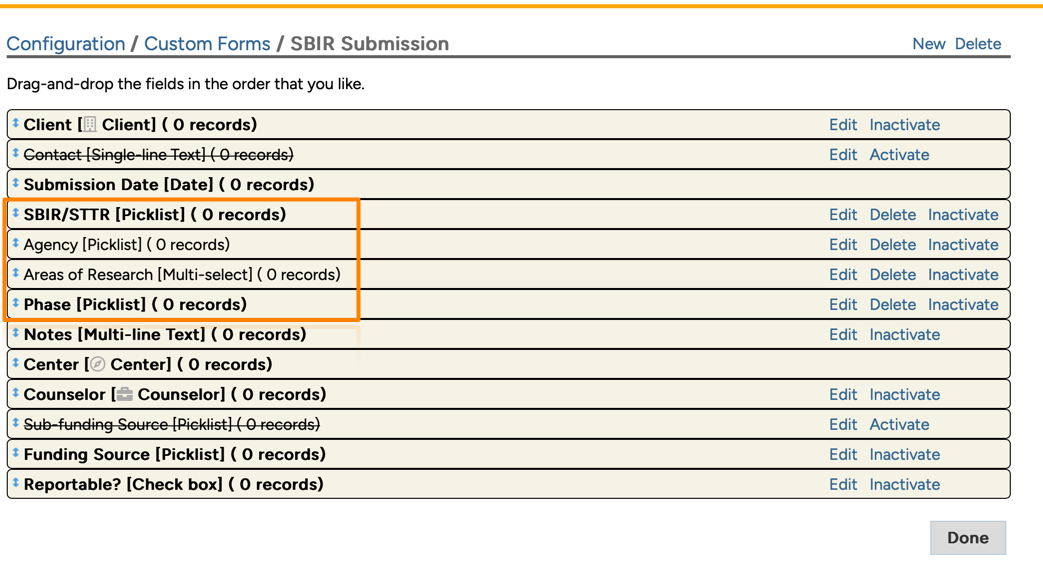
When you've completed all the settings for your field, click the Save button. Neoserra places your newly created field as the last field on the form. Continue to add as many fields as desired to the form. Once you have added all the fields to the form that you want to track, you can reorder them by dragging them up or down within the Neoserra Custom Forms interface. You will notice that the newly added fields (highlighted in orange) have been moved within the interface. The order in which you see the fields here is the order in which they will be presented to the user:
Customizing the Form's Record Summary Listing
Once you've added all the fields to your form, then you can now activate the form by editing the "Properties" of the form:
Highlighted in green, you can choose to activate the form. And highlighted in orange your can choose which columns will appear on the summary listin page in Neoserra:
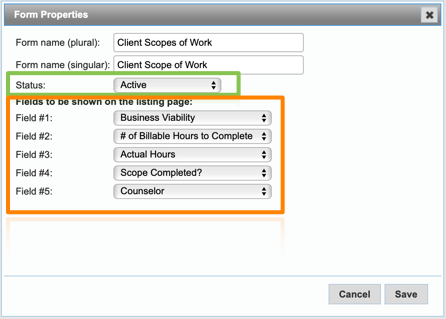
By default, Neoserra will always show the date of the form. And, assuming that you didn't inactivate the client, counselor or funding source fields, then the client/counselor/funding source will also be included in the summary listing, which leaves you five additional columns to customize.

Assuming you have changed the status of the form to "Active" then your users can now start to create new records using your custom form. Since custom forms are categorized as client activity forms, a user's permissions in the "Client Activity (Sessions, Awards, etc.)" database area directly determines their level of access to custom forms.
Note: To report on the data in your custom forms, you can create custom reports.
Editing the Fields on an Existing Custom Form
You can edit or inactivate the individual fields found on a custom form from the same interface in which they were created. To edit/inactivate a field found on a custom form, follow the next set of steps:
- In Neoserra, select Administration|Configuration to open the global configurations interface (only Neoserra database administrators have the necessary permissions to access the Configuration menu).
- From the Configuration menu, click "Custom Forms."
- In the "Name" column, click the name of the custom form that uses the field you would like to edit.
- From the list of fields, find the field that you want to edit and click the corresponding "Edit" or "Inactivate" hyperlink that displays to the right.
Important: Be very careful about editing fields in such a way that you change their intentions. For example, if you edit the name of a yes/no field from "Out of State?" to "In State?", then all values entered before the edit will read the exact opposite of what was intended when the field was originally completed. If you think your edit could cause a disconnect with values previously entered into this field, then, as a general rule, we recommend inactivating the field and creating a new one (rather than editing it) to preserve historical data.
Important: OutreachSystems recommends that you never edit or delete a previously-created custom picklist or multi-select choice. If you feel that you must, please contact us first so we can explain the ramifications of doing this. This is not the case for system wide picklists which can be modified.
Note: If attempting to edit one of the default fields that are automatically included with each custom form, you have very limited options. All you can do is toggle their mandatory or visible status. You will notice that the "Date" and "Center" field are always included on every form and cannot be edited by you or inactivated.
Inactivating a Custom Form
If, down the road, you ever decide that the form is no longer useful or relevant for your program, you have the option to inactivate it. There are two inactive statuses available:
- Inactive (read only). If you inactivate it using the "Inactive (read only)" status, users are still able to easily view and access previously-created records, but cannot create any new records.
- Inactive (invisible). If you inactivate the form using the "Inactive (invisible)" status, then the form title disappears from Neoserra' left-hand menu altogether and you are no longer able to access any summary views of the records created for this form. The records are not permanently gone; they can still be subsetted on and even viewed from a client's History of Activity tab. Also, if you ever wanted to report on the records in the future, you could temporarily change the form to read-only inactive status to bring back the summary view.
Using Searchlight to identify duplicates
Depending upon the type of form that you have created, you may want to enable the Neoserra Searchlight duplicate warning functionality. The Searchlight functionality allows you to specify a field on your form that is used to help identify duplicate records as discussed here.
Converting a Custom Form into a Project
Now that you have created your form you can use it as a way to track certain metrics with your client, or, you can turn the form into a project. A project is a way for you to identify a task that may take multiple interactions to complete. A Statement of Work is a good example of a project. It has a defined start and end date, and it defines the work to be completed, on behalf of the client. Thus, the project defines the scope, and then individual counseling sessions can be associated with the project for each time you meet with the client, or work on behalf of the client.
For more information about Projects, please refer here.
Want more? Browse our extensive list of Neoserra FAQs.