Can our program customize the defaults of the drop down pick lists?
Yes, you can create your own drop down choices but please remember to do so with caution. Some fields are specifically tied to your SBA or DoD reporting requirements as discussed in this FAQ.
However, assuming that you want to change a drop down that does not impact your reporting requirements, then a Neoserra database administrator can customize several aspects of the built-in pick lists from the Configuration screen. Specifically, you can:
- Add user-defined choices
- Edit user-defined choices
- Inactivate a choice so that it is no longer available for selection
- Set a default choice
- Make the entire pick list field invisible
- Make the pick list field mandatory
- Make your own pick list
Adding User-Defined Choices to Built-In Pick Lists
Many of Neoserra' built-in pick lists allow you to complement their existing choices with your own custom choices. However, there are some pick lists that cannnot be modified. Whether or not you can add your own configurable choices to a pick list depend upon the purpose of the pick list. If the pick list represents a list of standardized choices, such as states or countries, then you cannot add user-defined choices to it. Also, if the pick list represents data critical to SBA or DoD reporting, then, to ensure reporting integrity, you are typically not able to customize it.
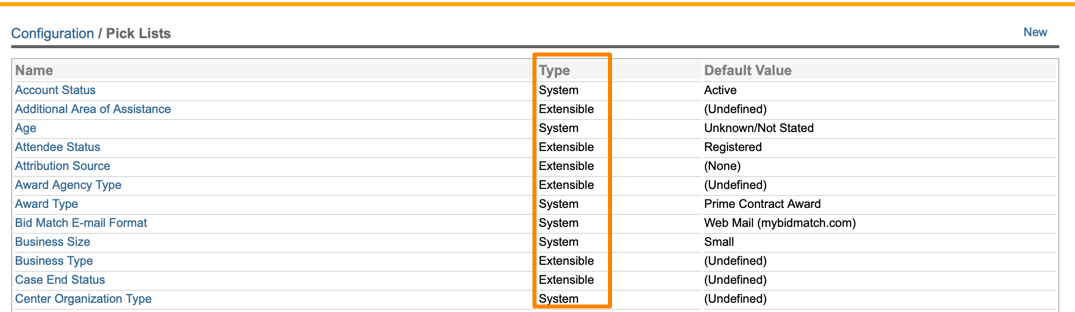
To quickly identify whether or not you're able to add user-defined choices to a particular built-in pick list, go to the "Pick Lists" menu under Administration|Configuration. In the "Type" column, look to see whether the value is "Extensible" or "System," as shown in the next graphic. If it is "Extensible," you are free to add choices to the pick list's drop-down list. If you make your own picklist, then you may additionally see a type "User-defined" which means it is a pick list created by one of your database administrators.
Once you've determined that you can add your own choices to the pick list you had in mind, follow the next set of steps to do so:
- Enter administrator-mode and select Administration|Configuration.
- Click "Pick Lists."
- In the "Name" column, click the name of the pick list field for which you would like to add new choices to.
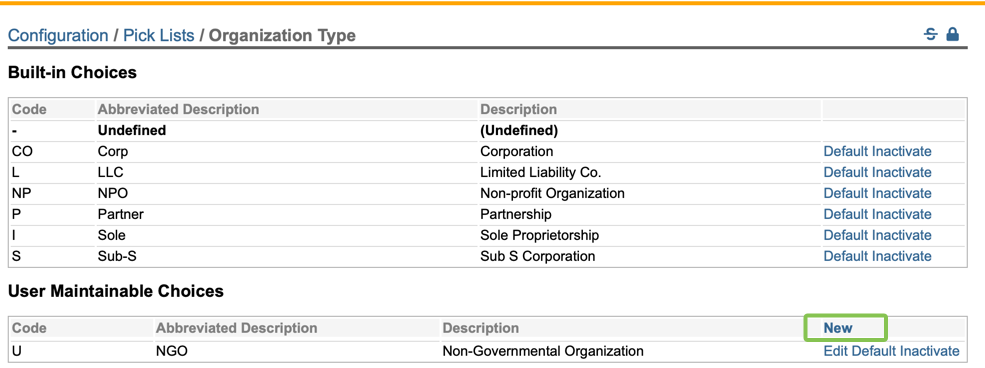
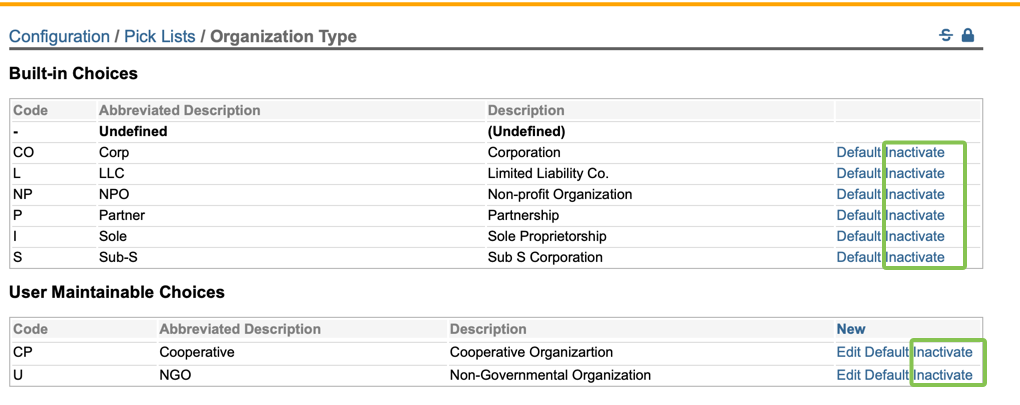
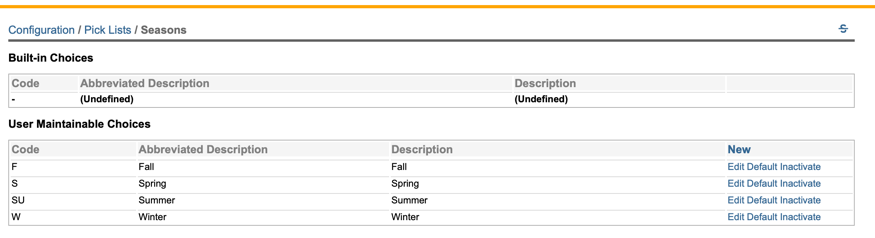
- On the following screen, you'll notice two tables. The top table displays all the built-in choices for the pick list. The bottom table displays any user-defined choices that were previously established. To create a new user-defined choice, click the "New" hyperlink located in the far right column of the bottom table's header, as shown in the next graphic.
- From the pop-up window that appears, enter a code for the new pick list choice into the Code field, an abbreviated description of the choice in the Abbreviated Description field (this abbreviation will display in columnar reports when there is not enough room for the full description), and, finally, the full description of the pick list choice in the Description field.
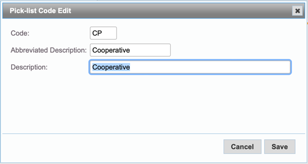
- Click the Save button.
- You'll now see your new user-defined choice listed in the bottom table.
Note: As discussed in a later section of this FAQ, you can make your new user-defined choice the default choice by clicking the "Default" hyperlink located in the far right column of the table.
Editing User-Defined Choices
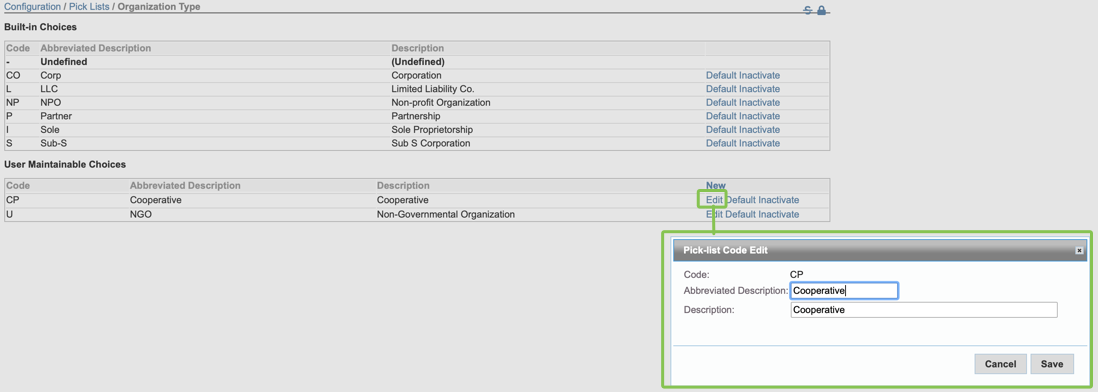
You can edit user-defined pick list choices from the same interface in which they were originally created. Simply click the "Edit" hyperlink located in the far right column of the table, as shown in the next graphic. You can edit the abbreviation or the full description of the pick list choice, but not the previously-defined code.
Note: You can only edit user-defined pick list choices, never built-in choices. Built-in choices are system-defined and permanently locked down.
Inactivating Pick List Choices
You can inactivate pick list choices for any built-in pick list field, regardless of whether it is a system or user field. In other words, even if you can't add user-defined choices to the pick list, you can still inactivate the built-in choices for that pick list. When you inactivate a pick list choice, rest assured that all records that reference that choice will be preserved with that choice still in place. What changes is your ability to select an inactivated choice when creating new records.
To inactivate a pick list choice, follow the next set of steps:
- Enter administrator-mode and select Administration|Configuration.
- Click "Pick Lists."
- In the "Name" column, click the name of the pick list field for which you would like to add new choices to.
- Find the choice in the table of choices and click the "Inactivate" hyperlink located in the far right column, as shown in the next graphic.
- The choice you just inactivated will now either have a strike-out line running through it:
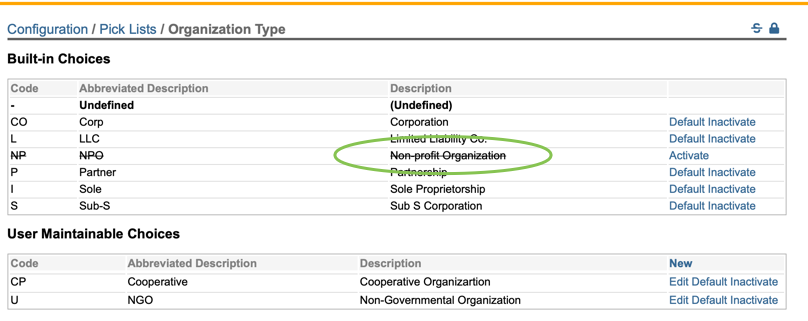
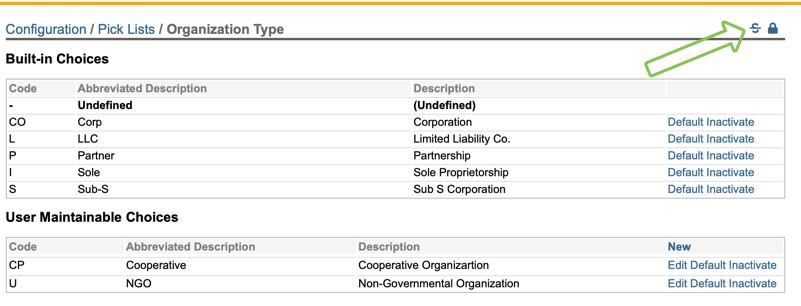
Or it will disappear from the list. But don't worry, it isn't gone permanently! You can see all the inacivated choices by clicking on the Strikethrough icon at the top of the page:
Don't see the "Inactivate" hyperlink? Then it's likely that you're either trying to inactivate (1) the default pick list choice, in which case you must first set another pick list choice as the default or (2) the one required built-in picklist choice of "(Undefined)" or something similar that must always remain in place.
Note: To reactivate the choice at a later date, simply return here and click the "Activate" hyperlink next to the choice. Make sure you click the Strikethrough icon first to see all inactivated choices. In fact, you will need to reactivate a choice if you ever need to filter, report or run a scorecard on the inactivated pick list choice.
Setting a Default Pick List Choice
If there is one particular pick list option that your program uses the majority of the time, whether it is a built-in or a previously-added user-defined pick list choice, you can set it as the default choice for that pick list. Default choices auto-fill upon creation of a new record. For example, if your program worked exclusively with Native Americans, you could set the "Native American or Alaskan Native" choice as the default for the Race field found in contact records. Then, each time a new contact record was created, the Race field would automatically populate with the value of "Native American or Alaskan Native." Default values can be overridden before the record is saved, but if it's the appropriate value the majority of the time, then the ability to set pick list defaults becomes a time-saving feature during data entry. To set a pick list choice as the default, follow the next set of steps:
- Enter administrator-mode and select Administration|Configuration.
- Click "Pick Lists."
- In the "Name" column, click the name of the pick list field for which you would like to set a default.
- Find the choice in the table of choices and click the "Default" hyperlink located in the far right column.
- The choice you just set as the default will now display as bolded.
Don't see the "Default" hyperlink? Then the choice was either (1) already set as the default (default choices are bolded) or (2) previously made inactive and must first be reactivated before it can be made the default.
Making the Entire Pick List Field Invisible
To remove a pick list field from a record altogether, visit the "Field Requirements" menu item under Administration|Configuration. As long as the field isn't required by Neoserra for proper functioning, you are able to make it invisible.
Making the Pick List Field Mandatory
To make a pick list field mandatory, visit the "Field Requirements" menu item under Administration|Configuration. From here, you can ensure that important fields are not overlooked during data entry. A good strategy for making a pick list field mandatory is to also set "Undefined" or "None" as its default choice. That way, users are forced to consider the field when saving a new record.
Making Your Own Pick List
Yes, you can make your own pick list which can then be used within custom forms and user-defined fields. The benefit of creating a system-wide pick list is that the same pick list can be used in diferent places without having to recreate it each time, and a system-wide pick list has better choice management, in the sense that you can inactivate choices without losing the data that was previously captured by that choice.
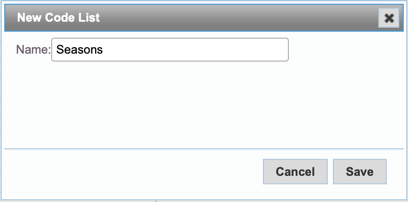
To create your own system-wide picklist just go to Administration|Configuration|Pick Lists and click "New." Next, enter the name of your pick list:
You will not be able to create any Built-in choices, since this pick list is unique to your Neoserra instance, but you can create your own User-maintenable choices:
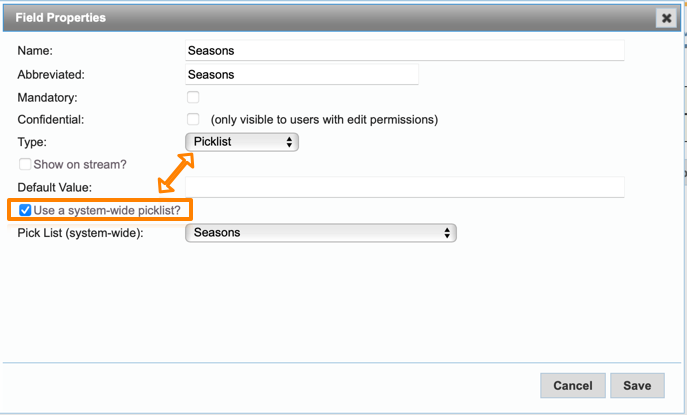
When you create a user-defined field that wants to utilize this newly created pick list, then you can select "Use system-wide picklist?" checkbox and select the pick list from the drop down:
Want more? Browse our extensive list of Neoserra FAQs.