How do I create user and group accounts?
Important: Only Neoserra administrators can create user accounts and groups. And the following information is necessary for each new user account:
- First, last name
- Email address
- Work phone number
- Cell phone number
- Center to which they will be assigned
- Street address, if different from the center
Users will need a user account to access Neoserra. A counselor record is NOT a user account. A user account consists of a user name and password and a set of permissions. When someone logs into Neoserra, it is the user account that determines their level of access to the database. If you anticipate assigning the same set of permissions repeatedly to multiple users, you'll want to consider additionally creating a group account.
This article is divided into six related topics:
- Creating User Accounts
- Creating Group Accounts
- Assigning Permissions to User and Group Accounts
- Forgot your password?
- Best Practices for Permissions
- How do users know their permissions?
- How do I add/delete dashboards for a user?
Creating User Accounts
As noted above, a user account is not the same as a counselor record. Some users may not be counselors and some counselors may not have a user account. For example, administrative staff may be provided with a user account so that they can do data entry on behalf of one or more counselors, even though they themselves do not provide one-on-one counseling with a client and thus would not have a counselor record in the database. However, with that said, there is often a one-to-one correlation between a user account and a counselor which is why Neoserra allows you to create a new user account and counselor record simultaneously.
Note: If you have a counselor who will not access Neoserra but who does need a counselor record in the Neoserra database, then your Neoserra administrator will need to create the counselor record.
The steps for creating a user account (and, optionally, a counselor record) are outlined next:
- Enter administrator-mode.
- Select Administration|Accounts.
- In the upper right corner of the "Users" interface, click the "New" hyperlink.
- From the I want to create field, indicate whether you will be creating a new user account record only or both a new user account and new counselor record.
- From the Center field's drop-down menu, assign the center that the user is most closely affiliated with.
- In the First Name and Last Name fields, enter the new user's name.
- Enter a valid e-mail address for the user into the Email Address field. This e-mail address can later be used to identify the user account when a password reset is requested (assuming your database is configured to allow users to reset their own passwords).
- Next, enter an office phone number for the counselor record. If you are just creating a user record, then this field won't be required.
- A Mobile phone number, on the other hand, is required for all users. Neoserra will use the mobile phone number for Two Factor Authentication.
- The address information corresponding to the center selected in the Center drop down will be displayed. If the counselor has a different office address then you can overwrite the address information.
- Next, assign the login and password that is required to access Neoserra.
- If you would like to assign your new user the exact same permission sets as an existing user, select the user from the Copy permission's from drop-down menu.
- Click the Submit button.
- You will now be prompted to send an email to the newly created user to provide them with their Neoserra username and password:
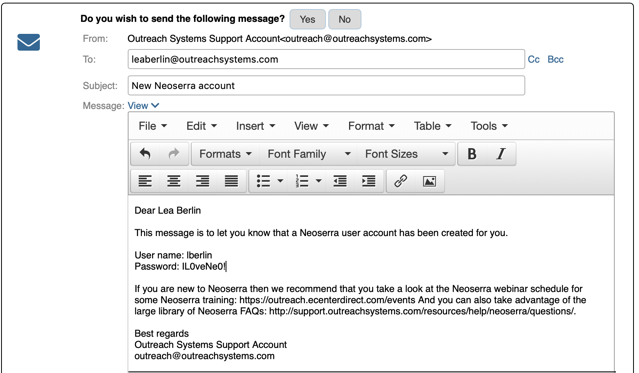
By default, this email template does not include your Neoserra database URL. It is strongly recommended that, as an administrator, you customize this email template and add your unique Neoserra URL to this email message template.
- Upon clicking Submit, you will see the user account screen with some additional settings to be updated:
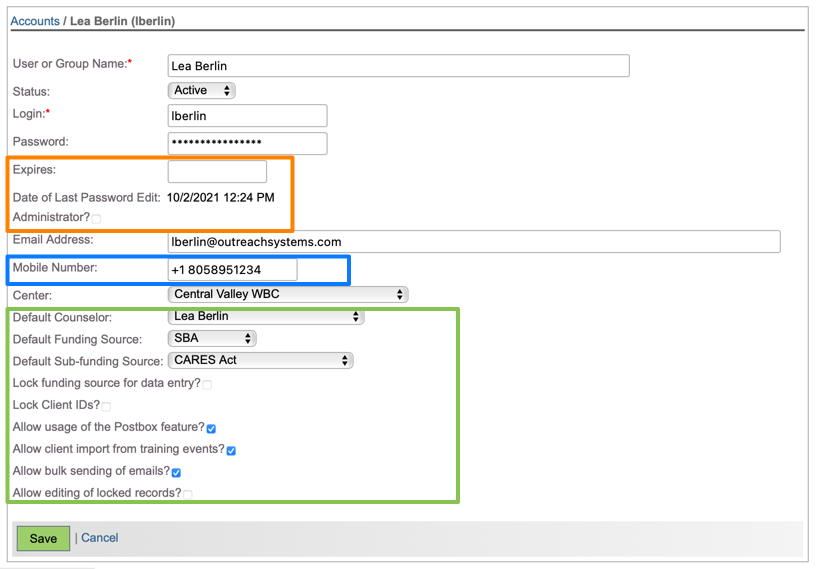
Each of these additional settings are described in more detail below:
- If this user account is being set up for a temporary employee such as a student worker or volunteer, then you can set a date when the user account will automatically expire. This field can also be used when you have an employee who will be leaving on a certain date. By entering the day after their last day of employment you can ensure that their entire account will be locked at the start (i.e. midnight) of the expiration date. In other words, if you set the date to June 5, 2018 then the account will expire at 06-05-2018 00:00:00, or at the first second of June 5th, 2018.
- To grant the new user full access to every area of the Neoserra database, including the ability to create user accounts, select the Administrator? check box.
- The user's center association, and their mobile phone number and email address were configured in the prior step, but it warrants repeating that the mobile phone number is essential for 2-Factor Authentication.
- From the Default Counselor field's drop-down menu, you can optionally assign the counselor that the user is most closely affiliated with. If you had chosen to create both a new user account and counselor record in step 4, then this field will automatically default to the new counselor record that you just created.
- From the Default Funding Source and Default Sub-funding Source fields' drop-down menus, assign the funding and sub-funding sources that the user most commonly works under.
- Lock funding source for data entry?. If you lock an account's funding source for data entry, the user will not be able to edit the Funding Source fields in any records that they create or modify, regardless of the add or edit permissions later assigned to the account. This lock does not apply to the Sub-funding Source fields.
- If you would like to prevent the user from editing client IDs in existing records or overriding the system-defined client IDs automatically generated for new client records, select the Lock client IDs? option.
- On a user-by-user basis you can Allow usage of the (or disable) the postbox feature. Generally speaking this feature is found to be very beneficial when used correctly and we encourage your users to take advantage of this Neoserra functionality. However, when users do not take care to review their postbox-generated sessions then it can create orphaned sessions that ultimately lead to bad reporting.
- We advise you to use caution when turning on the Allow client import from training events? checkbox. This feature would allow a non-administrator user to import client data into the Neoserra database without using the Neoserra client validation.
- Next, you can choose to Allow bulk sending of emails? on a user-by-user basis. Neoserra considers a bulk email to be any email message with 5 or more recipients. Neoserra allows the user normally speaking to send emails from withing Neoserra to as many recipients as they want. This feature is very powerful and can be very beneficial in your marketing but it also can be abused and users should be aware of the CAN-SPAM Act regulations. Users that violate the Act can have this feature disabled.
- Last but not least, we have Allow editing of locked records? . This feature would give a non-administrator user the ability to edit records that have been locked by the Neoserra record locking system. Checking this box would not allow these users to edit records that have been exported to the SBA backend system.
- Click Save to store your user settings.
- If you copied another user's permissions in step 9, you'll see those listed in the "Permissions" table located directly underneath your new user account's basic settings.
If you did not copy any permissions over, you'll notice that your new user account has been set up with one single default baseline permission set that provides view, report, edit, and add permissions to all database areas for the center associated with the user account. To remove, edit, or further add to the permissions listed here, perform one of the following actions:
- Click the "New," "Edit," or "Delete" hyperlink in the "Permissions" table to update permissions for your newly-established user account, as discussed in the later section of this FAQ titled Assigning Permissions to User and Group Accounts.
- Click the "New" hyperlink in the "Memberships" table to quickly assign a previously-established set of permissions to the user (i.e. add your new user as a member of a group account), as discussed in the following section.
Note: In most cases, you'll likely be creating both a user account and counselor record. However, there are two common scenarios in which you would need to create a user account only: (1) a counselor record already exists for the user or (2) you are creating a user account for someone other than a counselor, such as an assistant, who will be entering data on behalf of multiple counselors.
Note: This becomes the default current active center when the user logs in. Assuming you grant the user permissions to other centers, the user can switch centers at any time, but the center chosen here is considered by Neoserra to be the likely center for most of the user's activity.
Note: You'll notice that as you type the user's first/last name, Neoserra presents you with user account and/or counselor records that already exist in the database that could potentially be duplicates of the one you are creating. This is to help ensure that you don't create duplicates. If you had indicated, for example, that you were simultaneously creating both a user account and counselor record in step 4, but then discovered here that a counselor record already existed, you would want to change your prior selection to create just the user account and then associate the existing counselor record with the user account. Or vice versa.

Note: By default, Neoserra provides a common login format for the new user based on their first and last name, but you may override this. However, you may not include any extended characters in the login name. Only use alphanumeric characters and do not include accents.
Note: Passwords are case sensitive; logins are not. Since the data stored in the Neoserra database can be of a sensitive nature, it is important to choose a strong and secure password that include alpha-numeric characters along with special characters such as !@#$%^&*();:'",./?. Accent characters are also not allowed in the password.
Note: Do you want passwords to expire after a certain number of days, forcing users to keep passwords current? If so, then remember to update the General Settings under Administration|Configuration.
Note: If you intend to copy a user account multiple times for the purpose of creating several sets of identical permissions, you may want to consider creating a group account instead, as discussed in the Creating Group Accounts section of this article.
In orange:
By default, all administrator accounts are assigned the highest level of read, edit, add, and delete permissions to the entire database and, therefore, there is no need to assign individual permissions or group memberships. In addition, there are many privileges that are only available to administrator accounts, as discussed in the companion FAQ titled What is administrator-mode?
In blue:
In green:
Note: A counselor default is desirable if the new user represents a counselor or is solely affiliated with a single counselor because new records entered by the user will always default to the counselor chosen here. If the user enters data on behalf of many counselors, however, then it may be preferable to set "(No selection)" for this field.
Note: When creating a new client or conference record, the default funding assigned here automatically comes into play. However, if creating activity records (e.g. counseling session, award, investment, milestone records) for an existing client record, then it's likely that the default funding source already set for the client record will supersede the default funding source set for the user account. Whether a user account's default funding source or that of an existing client record takes precedence is dependent upon whether or not the Assign user account funding source in preference to client default? option is selected from the global configuration settings. There is one exception to this: if the user's default funding source is locked for data entry, as discussed in the next step, then the user account's default funding source always takes precedence, regardless of the status of the aforementioned global configuration.
It should be noted that new users must log in within 30 days of receiving their login credentials in order to keep their account active. For security reasons, Neoserra will inactivate a new user that has never logged in 30 days after their account was established.
Neoserra will also inactivate previously active users that have not logged in for 180 days.
Creating Group Accounts
A group account is similar to a user account, except that it doesn't possess a login name or password. It only contains permissions. Group accounts exist as an efficient way of assigning the same core set of permissions to more than one user. In addition, edits to group account permissions automatically cascade down to all group members, saving you the trouble of individually editing each user account when global updates need to be made.
The steps for creating a group account are outlined next:
- Enter administrator-mode.
- Select Administration|Accounts.
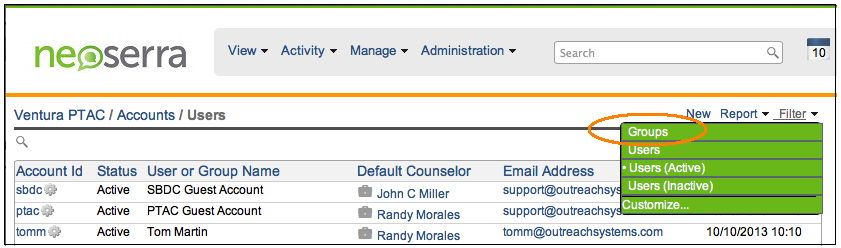
- In the upper right corner of the interface, select Filter|Groups from the list.
- Next, click the "New" hyperlink, which is also located in the upper right corner.
- Enter a group name and a short name (i.e. abbreviated name) for your new group account record. The short name is used in various columnar summary views.
- Click the Save button to save your new group account.
- Click the "New" hyperlink in the far right column of the header row of the "Permissions" table to create permissions for your newly-established group account:
The individual permission settings are discussed in the later section of this FAQ titled Assigning Permissions to User and Group Accounts.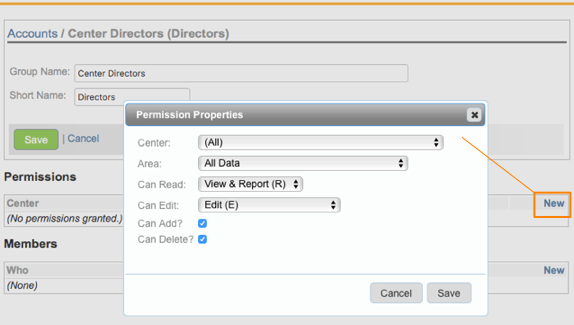
- Click the "New" hyperlink in the far right column of the header row of the "Members" table to add a member (i.e. existing active user account) to the new group account:
You can add multiple users at the same time, or you can choose all users by clicking the "Users" checkbox at the top of the interface.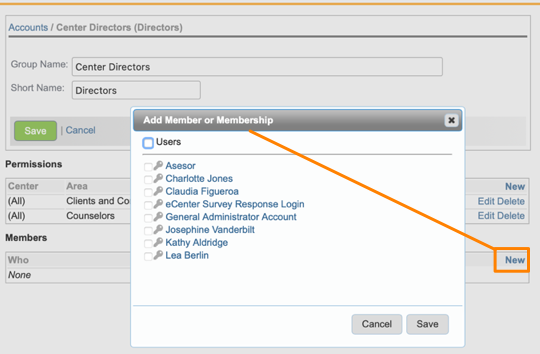
Note: In addition to adding members from a group account record, you can also assign group membership from an account record.
Assigning Permissions to User and Group Accounts
When you assign permissions to a user or group account, it's important to note that each set of permissions is applied in combination with the other permission settings to create the most flexible permissions possible. For example, if you create one set of permissions that allows a user access to every single area of the database, but then create a second set of permissions that denies access to one single area of the database, Neoserra will not respect the second set of permissions.
Similarly, if a user is a member of a group, that user's personal permissions combine with the group's permissions to create the most flexible permissions possible.
Important: Before following the set of steps below to assign permissions to a user or group account, we strongly recommend that you first review the FAQ titled How do user account permissions impact my ability to access Neoserra? so that you have a thorough understanding of the exact impact each permission type will have on the user's ability to interact with Neoserra.
The steps for assigning permissions to a user or group account are outlined next:
- Open, in view mode, the user or group account that you would like to assign permissions to.
- Click the "New" hyperlink in the far right column of the header row of the "Permissions" table.
- Select the center(s) and database area(s) that the current permission set will apply to.
- Decide which type of read and edit permissions you want to assign to the center/database area combination previously selected.
- Determine whether the user or group will have add or delete permissions for the center/database area combination previously selected.
- "Edit (including Center)" permissions of clients are necessary for the user to transfer clients from one center to another center. If you assign the ability to edit center ownership, be sure that the account also has the ability to add records to another center's database. Otherwise, the account will not be able to successfully change a record's center ownership.
- "Delete" permissions for clients and contacts are necessary for the user to be able to use the Merge functionality in Neoserra.
- Click the Save button to save the permission set.
- Repeat steps 2-6 to create as many permission sets as necessary.

Note:Keep in mind that the following permissions are necessary for two vital functions in Neoserra:
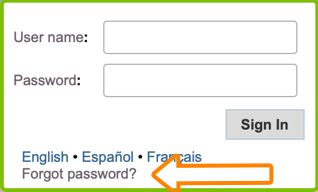
Forgot your password?
The user passwords are encrypted in the Neoserra database. If a user forgot their password, then the best course of action is for them to click the "Forgot Password" link on the login page:
Users that do not click this link and instead try to guess their password, should know that they will be locked out after their fifth failed attempt:
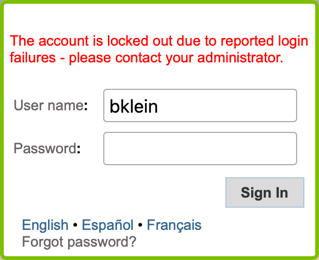
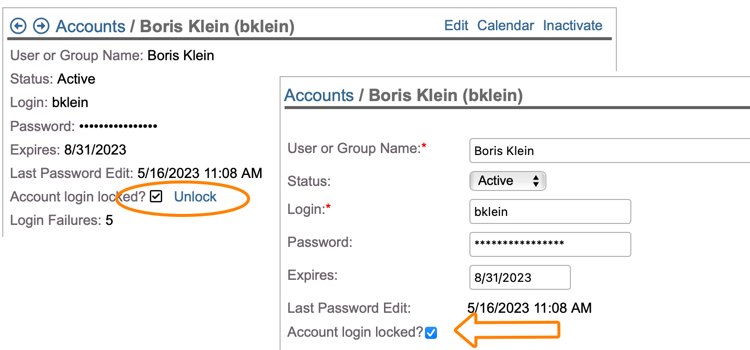
Once a user is locked out, they will not be able to log in, even if they now know the correct password. Once they are locked out, then the only recourse they have is to contact the Neoserra database administrator. The administrator can either click the unlock link on the read-only page, or edit the record and uncheck the "Account login locked?" box:
Best Practices for Permissions
Neoserra has a flexible permission structure allowing you to finely control the capabilities of each individual user. Permissions play an important role in maintaining the integrity of your Neoserra database. You don't want to grant powerful permissions (e.g. delete or edit) to users who should not be able to signficantly impact the database. However, you also don't want to restrict permissions to the point that users aren't able to do their jobs correctly.
For this reason, OutreachSystems has several "best practices" recommendations to maintain a healthy Neoserra database:
- As a general rule of thumb, OutreachSystems recommends that you do not make every user in your database a system administrator since administrators can change/delete records that have technically been "locked" and they can alter the behavior of Neoserra via the Configuration menu.
- We strongly recommend that you provide as a minimum View & Report permissions to every user for as many database areas and centers as possible. This goes a long way toward preventing duplicate records.
- We also recommend that you provide Edit and Add permissions to as many users as possible, for as many database areas and centers as possible to allow full collaboration across the database.
- Last but not least, we even recommend that you provide Delete permissions to as many users as possible, for as many database areas and centers as possible to allow users to delete errors as they encounter them. Keep in mind that client deletions are only possible as a two-step process where the second step requires Administrator approval. As such, users will not be able to delete clients without an administrator's assistance. Users with delete permissions will be able to merge records.
- But perhaps the most important thing to remember is to inactivate users that are no longer with your program. User accounts that are no longer used can pose a security risk to your database. Please refer to this FAQ to see how you can inactivate user accounts and transfer the corresponding counselor's clients to another counselor. Neoserra will perform a Data Maintenance check on all user accounts that have not been used in the last 90 days.
For security reasons, Neoserra will automatically inactivate user accounts that have not logged in for 6 months. You can re-activate the user account, however, if they need access then it is important for the user to login immediately following your reactivation of their account. The inactivation process runs nightly, thus the user account will be inactivated again if they don't log in subsequent to your re-activation.
When an account is inactivated, the point of contact identified on the Administration|Configuration|Settings page will receive an email notification.
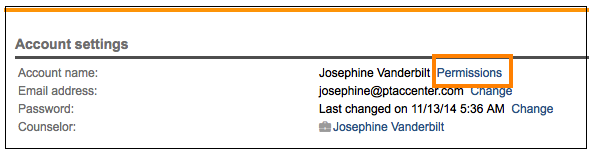
How do users know their permissions?
Some users may want to know what permissions have been assigned to them. If your users want to see their permissions, they can go to their personal preferences page and click on the Permissions link found there:
How do I add/delete dashboards for a user?
In the right hand panel, you have the ability to manage the scorecards assigned to the user's dashboard. For more information on scorecard dashboards, see the FAQ titled How do I display scorecards on the Neoserra dashboard?.
Want more? Browse our extensive list of Neoserra FAQs.