How do I create and upload my SBA data exports to COMNAVS?
COMNAVS is the data repository for the SBA administered Navigator program. Quarterly, Navigator hubs and spokes are required to export data to the COMNAVS system for reporting purposes. At the end of each quarter, you have 30 calendar days, to successfully submit your data. Your quarterly COMNAVS export includes one XML file that contains both your counseling/capital funding activity and your training activity. The XML file follows the 3516 guidelines as provided by SBA.
It is worth noting that Neoserra will only export client activity, in other words no activity with pre-clients or stakeholders will ever be exported. Furthermore, non-reportable sessions are never exported.To prepare yourself for the COMNAVS Export you first have to make sure that your configuration settings are set correctly, and then you can start the process of exporting data:
- Database configurations that are important to COMNAVS exports
- The actual process of creating, troubleshooting, and uploading export files to COMNAVS
Note: This FAQ is written for Neoserra administrators, operating in administrator-mode, because they are the only type of Neoserra users that are allowed to perform COMNAVS exports in Neoserra.
COMNAVS Configurations
There are several configurations that affect your COMNAVS export process. Each setting should be taken into consideration and is discussed next.
Center Settings
Each Hub and spoke should have their own center record in Neoserra. COMNAVS expects each hub/spoke to have their own Navigator Location ID. This ID is critical to allocate the performance to the correct center. If the ID is not entered in the center record, then Neoserra will not even allow you to export data from that center.
United States SBA/DoD Panel
Under the Administration|Configuration menu option, you will see the United States SBA/DoD panel. This panel contains several default settings that affect your COMNAVS export as discussed in this FAQ.
Here you can define the default funding source(s) and center(s) for all COMNAVS exports. When you initially create an export, its funding source filter will default to whatever is set in the Funding source(s) of activity configuration, but it can always be overridden at the time of COMNAVS export generation.
Similarly, the Center(s) to be included in export to COMNAVS setting allows you to define the default center(s) for all COMNAVS exports. When you initially create an export, its center filter will default to whatever is set here, although you can always override the default at the time of COMNAVS export generation.
General Settings Panel
The above mentioned settings are COMNAVS specific and are found under the on the SBA/DoD panel. There is an additional configuration on the "Settings" panel for you to be aware of. The "Settings" panel allows you to lock data in the Neoserra database that is older than a designated date. Why is this important? This is important because, although SBA allows edits to records previously submitted within the current fiscal year, once the fiscal year has closed, no records from the prior year may be edited.
To ensure that your Neoserra database is fully synchronized with the COMNAVS database, OutreachSystems strongly recommends that you lock data each year right before uploading your fourth-quarter export files to COMNAVS. This prevents users from adding or editing records that you are in the process of exporting. Neoserra administrators can override this lock so if you require the ability to change records based on Neoserra or COMNAVS error log data, you're still able to do so.
To lock the Neoserra database after every fiscal year, set the date prior to which users should not be able to edit records in Administration|Configuration|General Settings. For detailed information on record locking, see the FAQ titled How do I "lock" previously reported data to ensure database and reporting integrity?
Creating the COMNAVS Export Files
The process of exporting your data to COMNAVS can be broken down into the following steps. Ideally, you won't have any errors, but if you do, then you may need to do this process twice.
- Step 1: Create COMNAVS Export File
- Step 2: Download XML file to your computer
- Step 3: Login to COMNAVS
- Step 4: Upload XML file
- Step 5: ...WAIT...
- Step 6: Review possible errors and resubmit entire file
- Step 7: Accept All
Step 1: Create COMNAVS Export File
You will need to create a copy of your Neoserra database to be exported to COMNAVS. This copy will include some, but not all of the data found in Neoserra. For example, your COMNAVS export file will never include pre-clients or their activity. Nor will it include non-reportable activity.
Follow these steps to create your Export file:
- Enter Administrator-mode.
- From Neoserra, select Manage|Community Navigator.
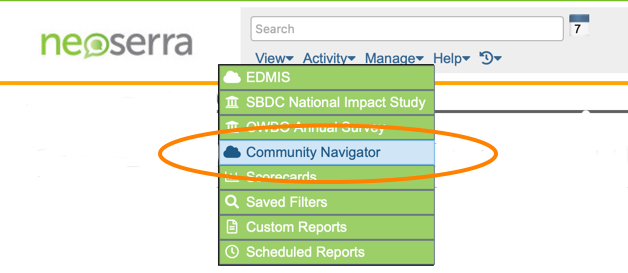
- Click the New link to create a new export.
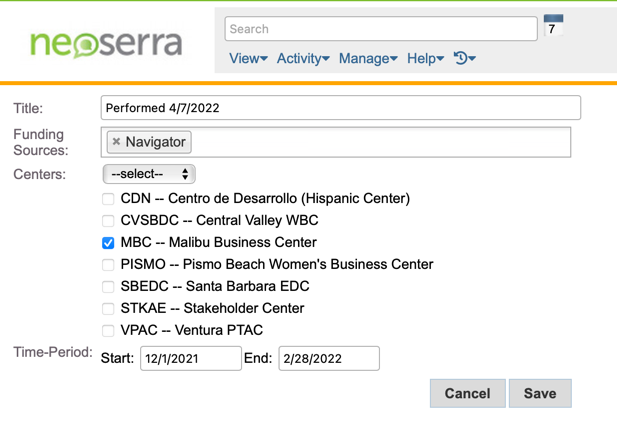
- In the Title field, enter a descriptive title that clearly states what data this test export encompasses.
- By default, the Funding Source(s) field displays the default funding source(s) selected under Administration|Configuration|General Settings. You can add additional funding sources if so desired, however, it would be best to update the general settings with these additional funding sources so as to ensure that the same funding sources are included in the next export.
- By default, the Center(s) field displays the default center(s) selected on the Administration|Configuration|General Settings page. You can include/exclude centers as needed, but again, any changes made here probably also should be selected on the General Settings page.
- Select the period for which you are creating the export - remember to always start with the start of the program year so as to pick up all newly entered sessions dated in the prior quarter. Thus, if you are exporting Q3 then the date range would be 12/1/YY -5/31/YY. By exporting everything new since the last export, you are ensuring that (1) any new records entered for prior quarters are picked up; (2) any records previously submitted that have since been edited are uploaded to COMNAVS. COMNAVS permits updates to previously-submitted records as long as those records were submitted within the current fiscal year.
- When all export criteria is set, click the Save button.
Step 2: Download XML file to your computer
Upon completion of the export process, Neoserra displays your newly-created COMNAVS export record:
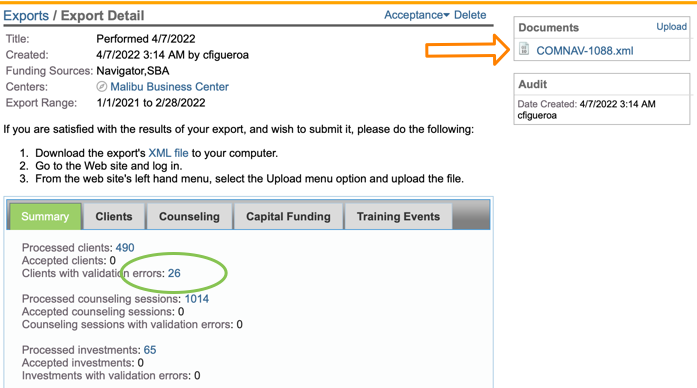
The COMNAVS export record provides a summary of the data to be exported and it will also identify any validation errors that Neoserra has encountered in your data. Since the COMNAVS system will reject all records if even one tiny error is found, the records with validation errors are excluded from your export. If you have validation errors, as show in the green circle above, then it is recommended that you resolve these errors first; once you have cycled through your errors then delete the incomplete export; and then create a brand new export to be uploaded to COMNAVS that includes all your activity.
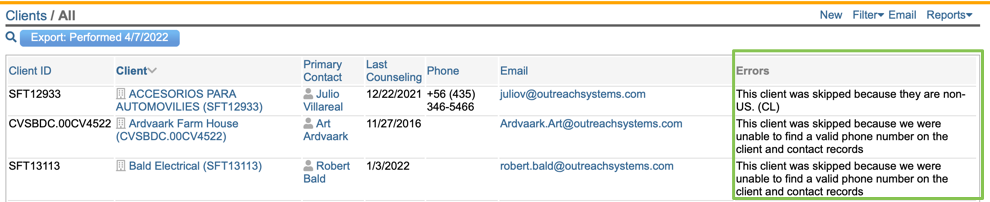
You can click on "Clients with validation errors" link to see which clients are being excluded from the export and the reason why:
Assuming you have no validation errors, then it is time to download the XML file which is included on the page in the upper right-hand corner (as highlighted by the orange arrow, above.
Step 3: Login to COMNAVS
You will need to obtain your login credentials to the COMNAVS site from SBA. OutreachSystems cannot provide access to the COMNAVS site and all questions related to the site should be directed to cnppsupport@sba.gov.
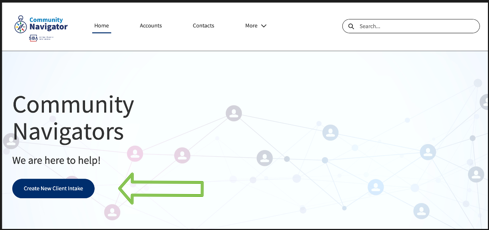
Step 4: Upload XML file
Once you are logged into the COMNAVS system then you will want to click on the "Create New Client Intake" button:
Select "XML Upload" and choose your "Hub/Spoke Account" as assigned to you by SBA, next click "Start Upload" and then click "Upload Files" to select your XML file:
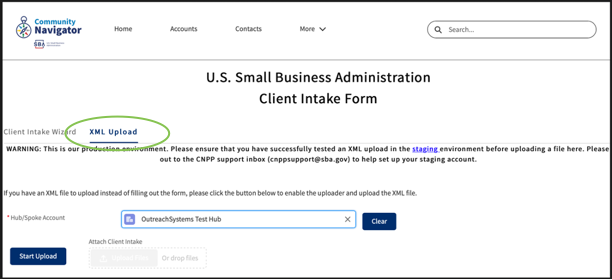
Choose the XML file that you downloaded to your system in Step 2.
Step 5: ... WAIT...
As of 3/30/2022 the COMNAVS system requires several 5 minute cycles to process the file. Within 5 minutes of you uploading your XML file, COMNAVS will determine the validity of your file (i.e. it will make sure that there are no XML errors.) Assuming there are not, then it will require 5 more minutes to create the accounts, and then another 5 minutes for you to be able to search on the accounts.
If there are no errors and you can verify that your records are in the COMNAVS system by searching on them, then you can jump to step 7. However, if there are errors, then these will need to be corrected and the entire file will need to be resubmitted. One small error, will cause your entire file to be rejected. It is important to check to make sure that you don't have any errors, as described in Step 6, below.
Step 6: Review possible errors, and resubmit entire file
As noted above, COMNAVS requires five minutes to process your file and check for errors. After you have uploaded the file, wait 5 minutes and then click on the "Accounts" link at the top of the screen. Next, select "All Accounts" and from here find the hub or spoke for which you just exported. Click on your hub/spoke and then click on "Related". Scroll down to see your Client Intake Uploads:
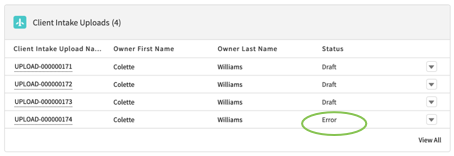
You may have to "View All" to see the most recent export. Ideally, you will see the word "Complete" in the status column, which means that COMNAVS was able to process your file without errors. If you see the word: "Error" then additional action is required. Click on the Upload link to see the actual errors:
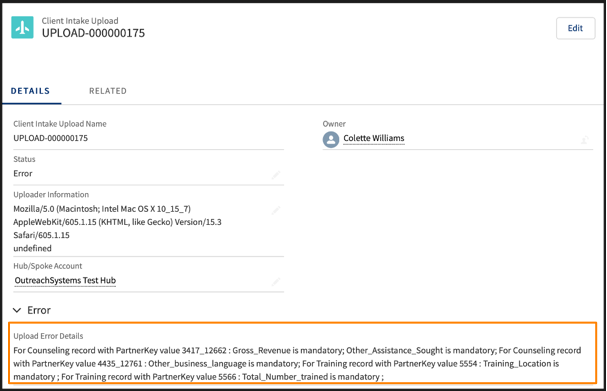
As you can see above, the error will not look very pretty nor be very meaningful. It is best if you cut and paste this message and send it to the outreach@outreachsystems.com.
Together with an OutreachSystems representative you can correct the errors, and then you will need to start at Step 1 again to create a new export file and upload it to COMNAVS again, and repeat the process.
Step 7: Accept All
Once you export a file that does not generate ANY errors, and you are able to see the clients and their associated intake records in COMNAVS, then you can confidently tell Neoserra that all your records were accepted.
This is a very important step, and not one to be overlooked! If records that have been accepted by COMNAVS aren't marked as accepted in Neoserra, Neoserra will continue to try and upload these records over and over again.
- From Neoserra, select Manage|Community Navigator
- Click View next to the export that you successfully uploaded.
- On the export record that you succcessfully uploaded, select Acceptance|Accept All:

Congratulations! You have completed your COMNAVS export process!
Note: Did you just complete a fourth-quarter export? If so, don't forget to lock data for the previous fiscal year, as described in Locking Data.
Want more? Browse our extensive list of Neoserra FAQs.