Can I add my own user-defined fields into the database?
Yes, you can add your own user-defined fields to Neoserra, but.... it is always important to double-check to make sure that a system-defined field is not already available to capture the very information you want to track! It is always best to use a system-defined field to track your details because system-defined field have added built-in logic and validation options that won't be available for user-defined fields.
You can check to see if a field is available but disabled under the Administration|Configuration|Field Requirements menu option.
A Neoserra database administrator can add user-defined fields in administrator-mode. Custom user-defined fields can be added to all record types. This FAQ discusses the addition of new user-defined fields for built-in record types. If you're looking for the ability to create entire new record types (e.g. a record type that tracks specialized activity), you'll want to refer to our custom forms FAQ titled How do I create custom forms?.
Read on to learn more about the process of:
- Creating user-defined fields
- Editing user-defined fields
- Inactivating user-defined fields
- Deleting user-defined fields
Creating User-Defined Fields
To create a new user-defined field:
- In Neoserra, enter administrator-mode and click on Administration|Configuration to open the global configurations interface.
- Click "User-Defined Fields."
- In the "Name" column, click the record type for which you would like to configure a new field, as shown in the following graphic.

It is absolutely critical that you track personal details on the CONTACT record, and company details on the CLIENT record. If you have any question as to what the best form would be for a new user-defined fielda, please don't hesitate to contact the OutreachSystems support team.
- Choose the form that you want to add the field to and then on the following screen, click the "New" link located in the upper right corner.
- In the Name field, enter a descriptive name for your new field. This name is what will display on the form.
- In the Abbreviated field, enter an abbreviation for the new field. The abbreviation will display in columnar reports when there is not enough room for the full description.
- Select the Mandatory check box if you would like the field to be a mandatory field for the record type.
- Select the Confidential check box if you would like the field to be hidden from users with view-only permissions for the record type. In other words, a user must have a minimum of edit permissions for the record type in order to edit or view the user-defined field.
- From the Type field's drop-down menu, designate the type of data value that best suits the field:
- Single-line Text. This field type allows up to 250 free-form text characters.
- Multi-line Text. This field type allows up to 8000 free-form text characters.
- Number. This field type only accepts numerals.
- Currency. This field type only accepts a currency value (i.e. numerals).
- Date. This field type requires a date value.
- Yes/No. This field type presents three radio buttons to choose from: "Yes," "No," and "(Undefined)." If you make a yes/no field type mandatory, then the value of "(Undefined)" is not allowed to remain—either "Yes" or "No" must be chosen when creating or editing a record.
- Picklist. This field type requires you to define a list of values to choose from. The list of values you create then become available from a picklist; when completing the field, only one value can be chosen.
- Multi-select. This field type also requires you to define a list of values to choose from. However, unlike the picklist field types, when completing a multi-select field, as many values as are applicable can be chosen.
- Label. This is not a field at all. Rather, it allows you to add text to organize or clarify other user-defined fields.
- If you selected "Multi-select" or "Picklist" as your field type in the previous step, proceed to the next step. Otherwise, skip to step 13.
- The "Multi-select" and "Picklist" options offer some additional configuration settings. For one, you can decide to use an existing system defined picklist, or create your own picklist that is only accessible for this field:
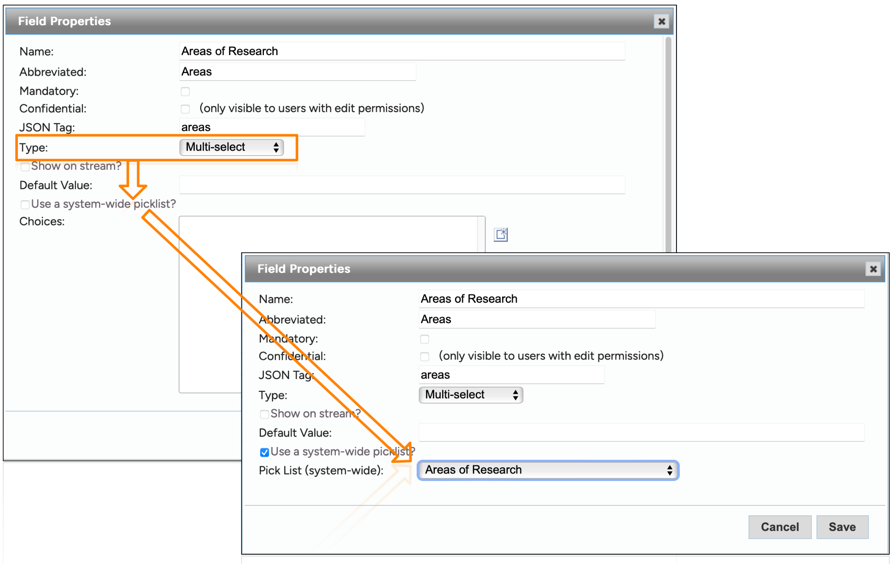
If you create your own picklist here, then you should note that making changes to a custom picklist down the road may be difficult to do. For example, if you have a picklist for Business Viability with the following four choices: "High," "Good," "Moderate,' and "Low" but now you want to remove "Moderate" from the list, then you will blank out the field for those records where this selection had been made.
- If you decided to create your own picklist, then you can always turn that picklist into a system-defined picklist down the road:
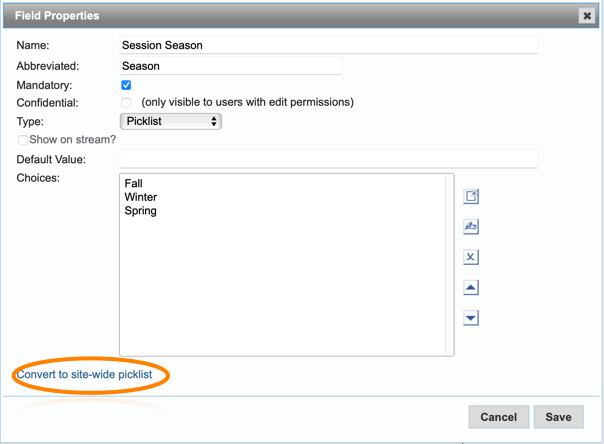
This may be beneficial if this is a drop down list that you frequently use or it is a list of choices that need to be updated regularly.
- The Show on stream? option allows you to add this field to the data stream view. Not all fields are automatically expanded in the data stream view but if you need some critical information to be available in the data stream then you can check this box. Keep in mind that the more you include in the stream view, the more difficult it will be to see other things.
- In the Default Value field, you can optionally create a default value that will initially be filled in for your user-defined field when a new record is created. If you are creating a default value for a picklist or multi-select field, be very careful to ensure that your default value exactly matches one of the values you entered in the Choices box.
- When you've completed all the settings for your user-defined field, click the Save button.
- Neoserra places your new user-defined field as the last field. However, you can easily reorder all the user-defined fields for a particular record type simply by dragging and dropping a field to a new position, as shown in the next graphic. The positioning you designate here is reflected on the associated record type.
Note: Default values are only auto-filled when creating new records, not when editing existing records.

Did you just create a new client or contact field that you would like to be part of the new client signup form that displays on eCenter Direct? Visit the FAQ titled How do I enable new clients to sign up for services from eCenter Direct?.
Editing User-Defined Fields
You can edit user-defined fields from the same interface in which they are created. To edit a user-defined field, follow the next set of steps:
- Once you are in administrator mode, go to Administration|Configuration.
- Click "User-Defined Fields."
- In the "Name" column, click the record type that uses the field you would like to edit.
- Find the user-defined field that you want to edit and click the corresponding "Edit" hyperlink that displays to the right.
- Make edits as appropriate and click the Save button.
Important: Be very careful about editing user-defined fields in such a way that you change their intentions. For example, if you edit the name of a yes/no field from "Out of State?" to "In State?", then all values entered before the edit will read the exact opposite of what was intended when the field was originally completed. If you think your edit could cause a disconnect with values previously entered into this field, then, as a general rule, we recommend inactivating the field and creating a new one (rather than editing it) to preserve historical data.
Also, OutreachSystems recommends that you never edit or delete a previously-created picklist or multi-select choice. If you feel that you must, please contact us first so we can explain the ramifications of doing this.
Inactivating User-Defined Fields
If you no longer want a user-defined field to be available on a form, you can inactivate it. Inactivating a user-defined field not only removes the field from the form when creating new records, it also removes the field from previously-created records. Although you can no longer see the field, it is still preserved in Neoserra' tables so that if you should ever need to query the database for the values previously stored by that field, you can—typically through the creation of a subset.
To inactivate a user-defined field, follow these steps:
- Enter Administrator-mode and go to Administration|Configuration.
- Click "User-Defined Fields."
- In the "Name" column, click the record type that uses the field you would like to edit.
- Find the user-defined field that you want to edit and click the corresponding "Inactivate" hyperlink that displays to the right.
- The field you just inactivated will now have a strike-out line running through it.
Note: Inactivated user-defined fields can be reactivated at any time, in which case the field (and any values entered prior to inactivation) are once again exposed.
Deleting User-Defined Fields
You can only delete user-defined fields that are not in use by any records. In parentheses following the field name, you will see how many records are using a particular field. Once a record has a value set for a user-defined field, you no longer have the option to delete the field and you will need to inactivate the field instead.
Want more? Browse our extensive list of Neoserra FAQs.