How do I create and manage training event attendee lists?
The ability to create and manage attendee lists from Neoserra's training event records is a very powerful feature. In this FAQ, we will discuss:
- Creating a Training Event Attendee List
- Managing Training Event Attendee Lists
- Edit attendee status and payment details
- Track attendance by session
- Send emails to attendee list
- Generate sign-in sheets, mailing labels, or other relevant reports
- Use QR codes to scan attendees
- Export to Excel
- Automatically Track Attendee Classifications
- Request that Training Event Surveys Be Completed
Creating a Training Event Attendee List
Before you can create a training event attendee list, you must first create the training event record. Once the training event record is created and saved you will notice an empty attendee list at the bottom of the screen. There are several ways to populate your attendee list:
- Ideally you are using Neoserra in conjunction with eCenter Direct, in which case you won't need to create an attendee list manually. If your event is published on eCenter then your attendee list will grow organically as people register via eCenter Direct. Please refer to the FAQ titled: How do I process new contacts entered via eCenter Direct? for more information.
- However, even if the event is published on eCenter Direct there may still be a need to manually add contacts in your Neoserra database, to the attendee list. If this is the case, then you can click the New link at the top of the attendee list to add new people to the list. Of course, these people must already exist in the Neoserra database. Put your cursor in the Search window and enter the name of the attendee to be added. The system will search for all contacts with the name entered. Once you find the one you want to add simply press "Enter" and either complete the status of the attendee and any optional fee information or add a second contact. If you add a second contact then all contacts added will need to have the same status/fee information when you add them. When everything looks correct, press "Save" to add the attendee(s) to the list. The window will remain open to allow you to add the next attendee(s) to the list.

If you set the status for the newly added person to either "Registered," "Payment Due," or to "Waitlisted" then the appropriate email template will be queued up at the top of the screen. You will need to decide if the email should be sent, or not. If you decide to send the email then you will need to click "Yes" for each one that you want to send:
If you add three people to the list (as per the example above), then three emails will be queued up. The email reminder will remain at the top of the event record for you to see until you log out of your session. In other words, the reminder will remain there even if you navigate off the training event record and then come back to it. The reminder is not visible to others and it will disappear once you log out.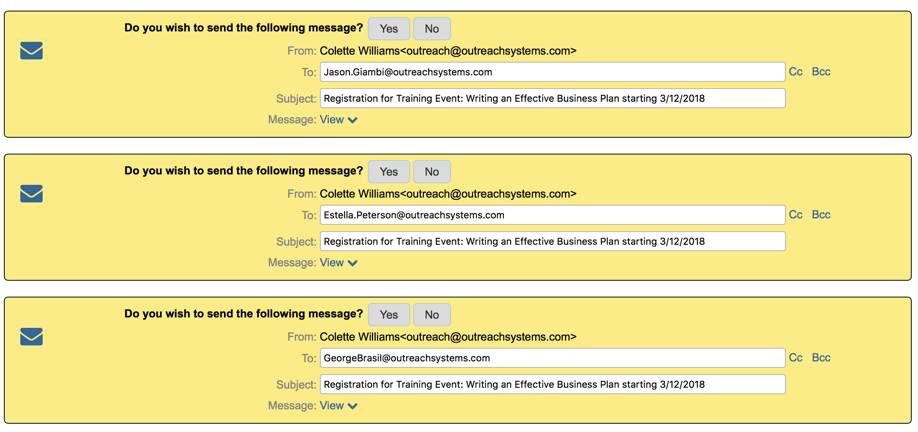
If you inadvertently click "No" and you decide that you do want to send the event confirmation email, then you can do so by clicking the "Email" link at the top of the attendee list. Since the email functionality at the top of the attendee list is intended for group emails, this will be considerably more cumbersome. When you send the group email you will need to remove those from the email distribution list that should not receive a second confirmation email.
- You can also add a contact to a training event from the contact record. Keep in mind you can only add contacts to training event records, not clients. People attend events, companies do not. From the contact record choose More|Training Events. By default, only those events that occurred within the last two weeks will show along with all future events for your center. If you want to see all events at all centers, just click the "All" link at the top of the screen.
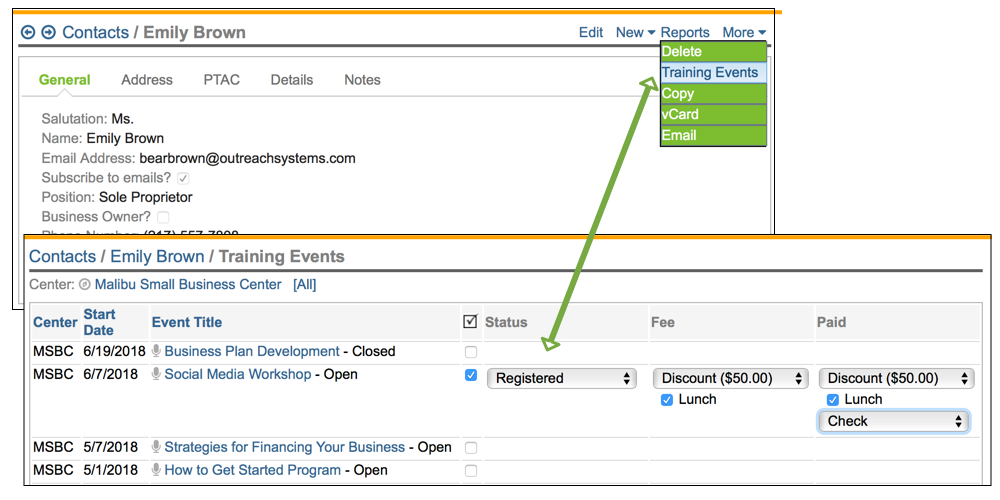
After you save your edits, you will be prompted to send the confirmation email to the client. Unlike the queued training event email, this email reminder will disappear once you click away from the screen.
- Last but not least, you can also Import attendee lists. There are two options to import, either you can import attendees from another Neoserra training event; or you can import attendees from a third-party file. Click Import and select your choice accordinginly:

- From a Training Event: If you select "From a Training Event" then you will be bringing in the names of people that attended one of your prior Neoserra events. You will be asked to enter the name of the prior training event whose attendees you want to import. The search window will look for all events in your center for the past year that match the name you entered:

Once you have found the attendee list that you want to import you can select which attendee status you want to include. For example, you may not want to import attendees that were no-shows or who cancelled. This feature is ideal for when you have events that follow each other in logical succession. For example, if you have a QuickBooks for Beginners class offered that is followed by a QuickBooks class on Financial Statements. All the attendees of the first workshop may be interested in the second workshop. Similarly, this feature might be beneficial if you host a large annual event and you want to invite the same people this year who also attended last year's event.
To bring in a group of attendees click "Save". The newly added attendee list will have every attendee listed as "Prospective." To update the attendees to a different status use the Batch option at the top of the attendee list (see below for more details.)
- From a File: Alternatively, after the event has taken place, you can also import names from an external file generated by another online registration system such as Zoom or GoToWebinar:
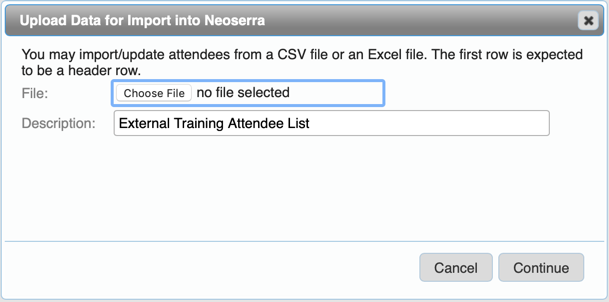
This feature not only adds attendees to your attendee list, if a name is found on the external file that does not yet exist in Neoserra, then you can also choose to automatically create the contact record for this new person in the Neoserra database. In other words, this feature automatically creates new contact records based upon the information found in the external file. Because this feature goes far beyond the scope of managing training event attendees it is discussed in its own FAQ titled: How do I import names from my third party event registration system such as Zoom, EventBrite or GoToWebinar?
- From a Training Event: If you select "From a Training Event" then you will be bringing in the names of people that attended one of your prior Neoserra events. You will be asked to enter the name of the prior training event whose attendees you want to import. The search window will look for all events in your center for the past year that match the name you entered:
- And what about those attendees to your event that you never intend to add into Neoserra? Perhaps these are attendees that come from out-of-state and have no on-going relationship with your program. Or perhaps there are some attendees that a co-sponsor is bringing to your event and you don't know their individual names. If you don't intend to add these people to Neoserra, but you still want to take credit for their attendance to your event, then you can add them as "Unlisted Attendees":

Neoserra will include these attendees in the total attendee count, in other words, it will add the unlisted attendees to the attendees listed in the attendee list and calculate the grand total:
Of course, Neoserra won't know anything about the demographics of these unlisted people. Thus, the total attendees will be updated accordingly, but not the demographic breakdown.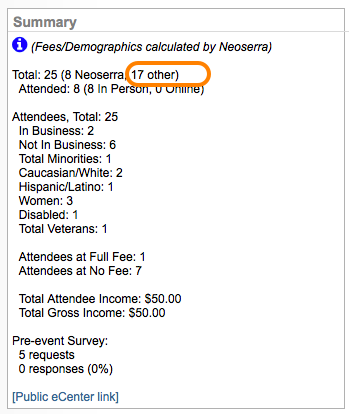
Managing Training Event Attendee Lists
As mentioned previously, there are many powerful attendee list management features. The "New " and "Import" commands have been discussed above, but there are a few other commands worth noting:

Specifically, these commands let us:
- Edit attendee status and payment details
- Track attendance by session
- Send emails to attendee list
- Generate sign-in sheets, mailing labels, or other relevant reports
- View attendee details
Edit Attendee Status and payment details
Once an event has passed, you should go into the training event attendee list and update the status of those who actually attended the event. You can do this one-by-one by using the Edit option at the top of the screen, or you can update all attendees by using the Batch option.
The Batch option is often useful if you want to set the majority of attendees to a certain status. Once the majority are set to the status you want, then you can edit the list one-by-one for those people who didn't show.

The batch option lets you Modify the status of all attendees as well as their presence and standard fee information. Since Neoserra supports multiple fee levels you cannot enter payment for all attendees in a batch mode other than possibly set everyone's payment to "complimentary".
Alternatively, you can also use the batch option to Delete a group of attendees. For example, if you had a large group of prospective attendees who never registered or attended the event, then you may want to delete them from the attendee list for clarity. Alternatively, you can delete a single person from the list by clicking the drop down arrow found to the right of the attendee's row.
While the batch option allows you to affect many attendees at once, it should be noted that this option does not initiate any emails to the attendees. In other words, if you batch update a group of prospective attendees to the status of "Registered" then you will need to remember to send these registrants the registration confirmation email because Neoserra will not automatically notify them. Furthermore, the batch mode does not support individual payment tracking.
To update the payment status of your attendees, it is best to use the Edit command. This allows you to update the "Fee Paid" column for each list member, one after the other, as shown in orange in the screenshot below:
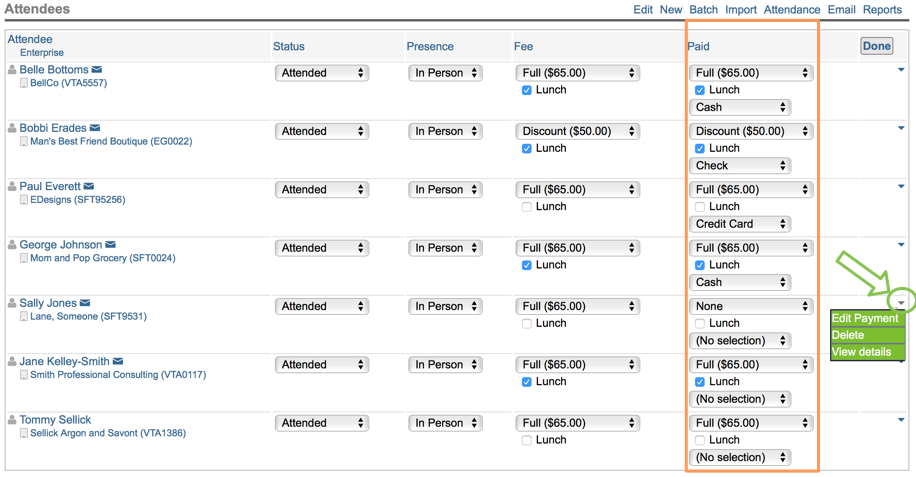
Any payments that are recorded will be assumed to be for all items selected. In other words, if the client is paying for their "seat" but they have also indicated that they want lunch, then it is assumed that they are also paying for lunch using the same payment method. Neoserra, cannot process multiple payment methods for the same client for the same event. Ultimately, Neoserra is a CRM application, not an accounting application.
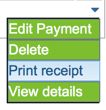
Upon saving your edits you can manually email a copy of the receipt to the client by clicking the down arrow next to the client line item on the right hand side of the attendee list. The email will include the receipt as a PDF attachment:
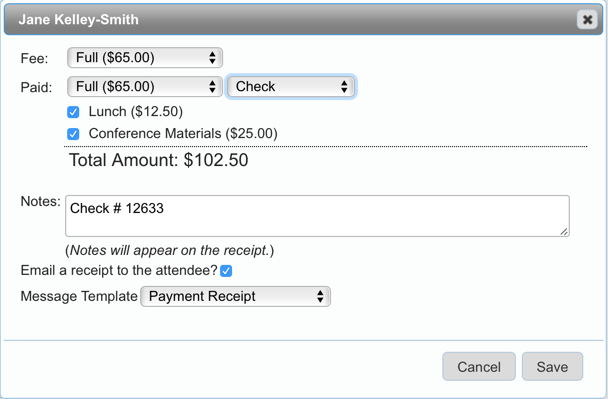
Alternatively to using the "Edit" command, you can also use the per attendee menu option as shown in green on the far right margin of the screen shot above. This interface offers a few more options including the ability to add notes regarding the payment and the ability to automatically send a payment receipt to the client.
If an attendee has registered, but they have not yet paid, then you can set the attendee's status to "Payment Due," which offers some special handling as discussed in this FAQ. This status option is only available for those sites that have eCenter Direct enabled.
By accurately tracking the fees paid by each list member, you allow Neoserra to optionally calculate the total income for the event. In addition to tracking the actual fees paid by the attendee, you can also track whether they paid by:
- Authorize.Net
- Cash
- CashNet
- Check
- Converge
- Credit Card
- NelNet
- PayPal
- TouchNet Upay
- Other
Assuming you have integrated your merchant account with Neoserra, then any payments received via these merchant account will automatically be updated accordingly.
Once an attendee has paid a particular fee, then that fee level will become un-editable. In the following screenshot, you will see that some of the fee levels can still be edited, whereas others cannot. The ones circled in green cannot be edited because one or more attendees have already paid a fee corresponding to each level:

Remember that you can get full audit information about the attendee record (including their payment) from the "Attendees" link on the Training Event page, as discussed in this FAQ.
By diligently tracking those that attended, Neoserra is able to automatically break down attendee classifications as well as more accurately track fee and income information. In addition, it will be easier for you to perform a variety of follow-up actions for attendees.
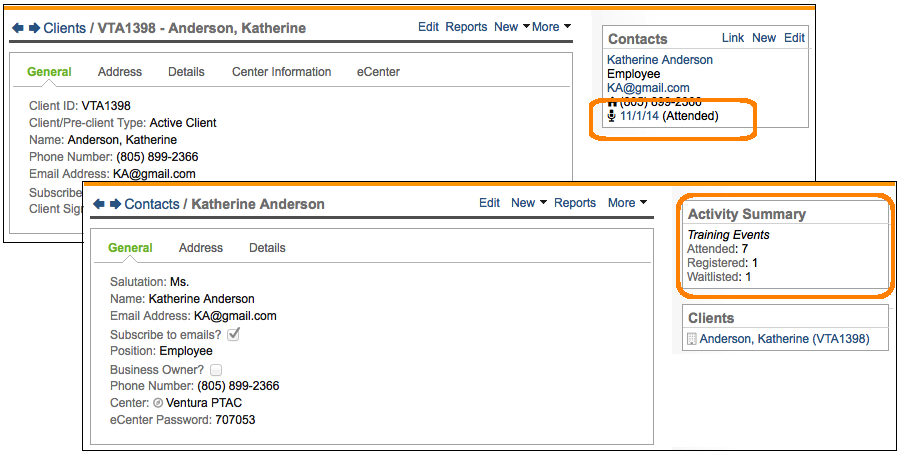
Furthermore, having accurate attendee list will provide for accurate client and contact records. The status of the contact's training events is always shown on their contact record and the status of the most recent event is shown on the client record:
Track attendance by session
One event, can have multiple sessions. Either consecutive sessions that take place over multiple weeks, or you can create multiple sessions to take place on the same day.

All sessions will be published on eCenter Direct to make it easier for attendees to see the complete scope of the program offered, and to add each session as an independent calendar entry. It is assumed, however, that the event as a whole, will have one fee associated with it. In other words, Neoserra does not support separate fees for separate sessions. Furthermore, the event's attendee list will serve as the master attendee list, while each session can have its own attendee list which will be a subset of the master:
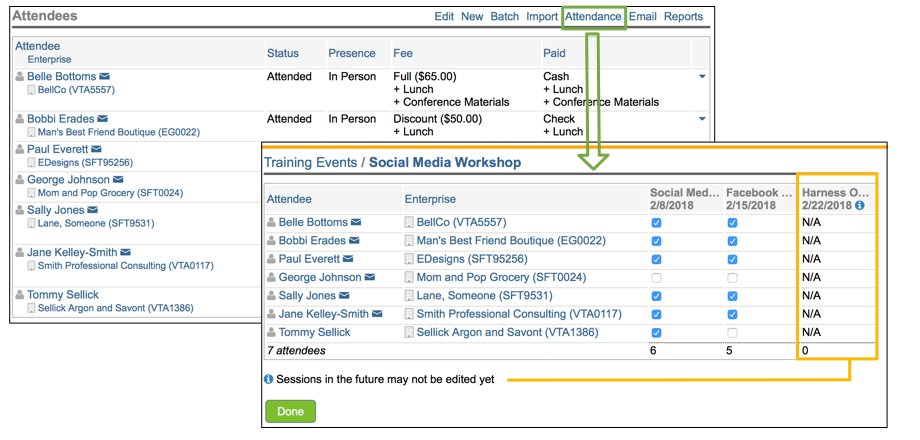
You will notice in the screenshot above, that the "Attendance" command option appears if/when you have an event with multiple sessions listed. The Attendance page allows you to check off who did, and who did not attend a particular session. Only attendees marked as either "Attended" or "Payment Due" will be available to check off. Attendees who were no-shows or who cancelled on the master list, will not be included on the individual sessions listing. Last but not least, in the screenshot above you will notice that only the first two session are available for editing. The third session occurs in the future and thus cannot be updated yet.
A separate field titled: "Number of Reportable Sessions" is provided to indicate the number of sessions to be reported to SBA. This separate field can be disabled for all non-SBA funded programs by your Neoserra database administrator under the Administration|Configuration|Field Requirements|Training Events menu option.
Send emails to attendee list
Once you have entered an event into Neoserra and you have started to add registrants to the attendee list, then you may want to stay in touch with your registrants using the Neoserra's email functionality. Clicking the Email link at the top of the attendee list allows you to send a variety of different email templates depending upon how your event is configured:
- Regular email - no template is invoked
- Training Event Announcement - used to advertise your event to prospective attendees
- Training Event Registration - used to confirm registration
- Training Follow-up - used after an event to thank the participants
- Training Reminder - used before an event to remind potential participants
- Payment Receipt - used to provide your attendees with a copy of their payment receipt
- Payment Reminder 1 - used to remind attendees that they need to pay for the event
- Payment Reminder 2 - second reminder to attendees that they need to pay for the event
- Pre-event Survey Request - available if a pre-training event survey is configured
- Post-event Survey Request - available if a post-training event survey is configured
- Additional custom templates may be available if configured
If you only want to send an email to a single attendee, then on the far right hand side of the attendees name on the attendee list, click on the down arrow to see the email functionality for emailing the selected attendee individually:

For more details on sending emails to attendees please refer to the FAQ titled: How do I send an email to all the members of a training event attendee list. Alternatively, many of these emails can also be automated using the Scheduled Emails functionality that is available on the training event record as discussed in the FAQ titled: How to add Scheduled Emails.
To advertise your event to clients who are NOT yet on the attendee list you can refer to the: How to advertise your event? FAQ for additional details.
Generate Training Event Reports
From the training event attendee list itself, you can generate a variety of reports:
- Attendance Report
- Attendance Sign-in (Name only)
- Attendance Sign-in (w/o Fees)
- Attendance Sign-in (with Fees)
- Attendance Sign-in (with Intent and Address)
- Attendance Sign-in (with Intent)
- Attendance with Presence Report
- Attendee Payments
- Training Events Receipt Report
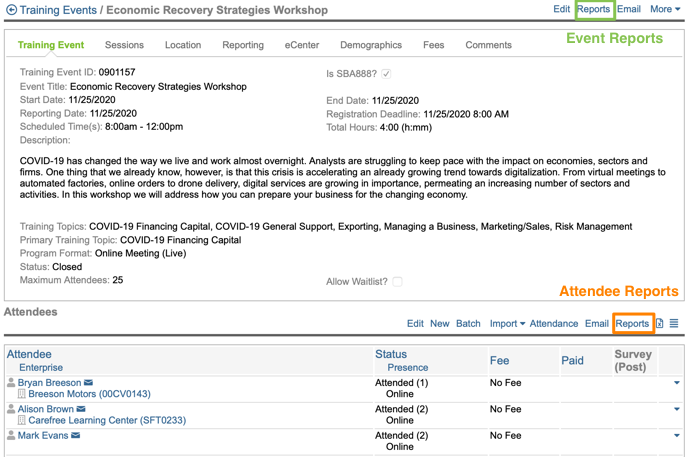
Simply click the Reports button located above the attendee list to generate your report.
Keep in mind, that these are all attendee list based reports. You can also generate a report at the training event level. The "Reports" link at the top of the training event record provides access to event reporting, whereas the "Reports" link at the top of the attendee list provides access to attendee reporting.
Use QR codes to scan attendees
If you want to use QR codes to send to your clients so that you can easily scan them in on the day of your event, then you will need to edit the Neoserra Conference Registration email template and the eCenter Direct Signup Confirmation (Existing User) email template.
You will want to add the [CONFERENCE_CHECKIN_CODE] substitution variable to the email message. Additionally, you could add this substitution variable to your training reminder email templates.
On the day of the event, take your mobile phone and log into Neoserra. This is important! Next, ask the registrants to present their QR code, and using the camera on your smart phone you can scan the code. You will then be presented with an interface to check the registrant in and allow them to add their signature.
It will be your responsibility to take note if the client has an outstanding balance, or not.
Export to Excel
In addition to generating pre-defined reports as provided by Neoserra you can also export the attendee list to Excel and generate your own reports:

For more information, please refer to this FAQ.
View attendee details
The list icon:
gives you more details about the attendee registration such as the exact time of registration and the details of payment.
Automatically Track Attendee Classifications
When reporting on training events, SBA requires that you classify your attendees. If you've maintained an accurate training event attendee list, Neoserra can automatically classify your attendees.
If the client record does not indicate that you have a signature for the client, then Neoserra will mark that client record with a yellow warning symbol:

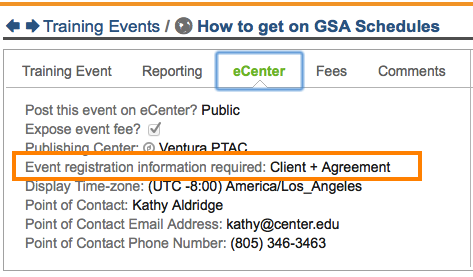
The warning symbol indicates that there is no eCenter Signature for that client. This warning symbol will only be displayed on those events that have set their "Event registration information required" field to "Client + Agreement:"
Note: It is up to you to make sure that you have the requisite signatures from the client on file. Neoserra is only warning you to a potential paperwork issue. Neoserra will not exclude these clients from your reporting. There are a variety of ways for you to obtain a signature from your clients.
SBA does not require that you obtain a signature from your training clients. However, when a training client seeks counseling services from an SBA-funded program, you will need to verify that you have the requisite signature from the client and Neoserra will notify you on the client record if you do not appear to have such a signature.
Request that Training Event Surveys Be Completed
Any event that you hold can be associated with a pre-training event survey, a post-training event survey, neither, or both. When you associate a survey with a training event record, Neoserra uses the attendee list to determine who the survey will be made available to on eCenter. Any new registrants to an event that are added to the attendee list after you have associated a pre-event survey with the event, will automatically be marked as survey candidates in the attendee list:

As the surveys are emailed to the registrants, the respective column will be updated with a checkbox indicating that they have been selected for the survey. Using the Edit option you will be able to overwrite this setting. Using the Batch option, you will be able to select a group of attendees and include them, en masse, to the survey list.
The process of creating training event surveys, specifying survey respondents via the training event attendee list, and advertising surveys via the training event attendee list is discussed in detail in the FAQ titled How do I create and distribute training event surveys?.
Keep in mind that surveys and evaluations are two different things in Neoserra. Surveys are electronic and associated with each attendee. Evaluation forms, on the other hand, are provided manually in hard-copy format to each attendee anonymously. Evaluation responses can be tallied under the Training Event|More|Evaluation Form menu option. The default evaluation questions are maintained by your system administrator under Administration|Configuration|Evaluation Form. This feature may also be turned on or off by your system administrator. For more details, please refer to the FAQ titled: How do I create a hard-copy, training evaluation form?
Want more? Browse our extensive list of Neoserra FAQs.
