How can I export data from my Neoserra database to another third-party application?
If you are a database administrator, then you can export data from Neoserra using the Neoserra Export Module.
If you are not a database administrator but you want to export data from Neoserra, then you can do so by generating a report in either the "Microsoft Excel (Export)" or the "CSV (Export)" output format. CSV stands for Comma Separated Values, and it's a file format (.csv) commonly used by spreadsheets. Most products will accept the import of CSV files. By creating a report in either Excel or CSV format, you are able to export your Neoserra data for import into another application. In most cases, you will want to create a custom report that matches the layout of the application to which you want to import. Once you have created your custom report and tested the import into your third party application, then you may want to set up the report to run on a scheduled basis.
Note: OutreachSystems can answer questions related to the process of creating a custom report and/or the process of setting up a scheduled report. However, OutreachSystems is not able to assist in the troubleshooting of the import process into the third-party application. The integration of data into another application is outside of the scope of our expertise and support.
The steps we will review in this FAQ are:
Create a custom report
When designing your custom report, you get to determine what fields you want to include in the report. You also get to determine every aspect of report layout including sort order and column header names.
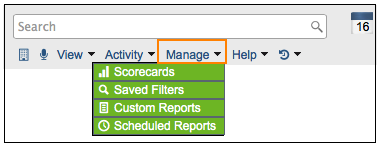
Custom reports are designed by record type. In other words, you can create a client report or a training event report, but you cannot create a report that includes both client data and training event data in the same report. If you need both client data and training event data then you will need to create two separate reports. All custom reports are accessed from the Manage|Custom Reports menu option:
To create a new custom report, follow these steps:
- Choose the type of custom report that you want to create.
- Click the New link in the upper right hand corner to open the custom reporting interface.
- Assign a name to your report.
- Custom reports created by you are, by default, only available to you. If you feel you want to share your report with the other users in your center, or potentially with everyone in the network, you can do so using the Available to field. If your user account is set up with full administrator privileges, you'll be able to see and manage all custom reports created by all users; not just those you created.
- Neoserra allows you to group records together for easier organization but this may be less important (or beneficial) if you are exporting the data. In addition to grouping records, you can also set primary, secondary, and even tertiary sort orders at the bottom of the screen for the records that display in your custom report output. These sort orders can be used regardless of whether a record grouping is established.
- Now you will need to decide which fields you want included in your custom report. Click Add a new row to open the drop down selection interface. The drop down selections are different for each report type and include all the fields available for inclusion on your specific report type report. You can start typing the first few letters of a field name and all relevant matches will appear:
You are initially provided with up to 10 columns, but if you need more, simply save your first ten columns, and then open the interface again to get ten more. When you have added all your fields click Save to see the rough layout of your report: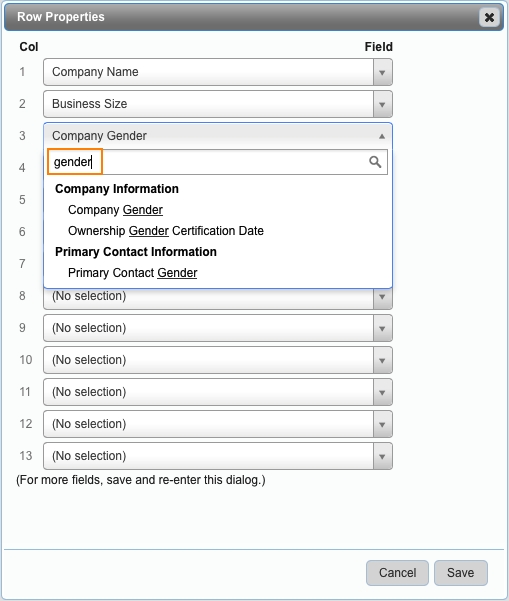
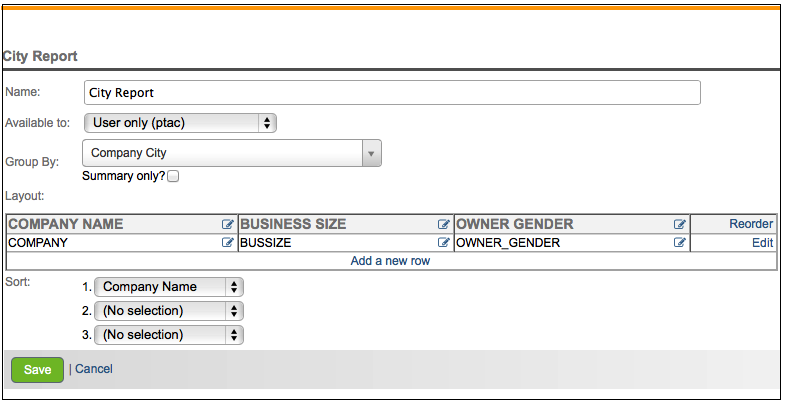
The fields you selected are listed in the order that you chose them from the drop down. To change the order, click the Reorder link and use the up/down arrow icons to move each field to its desired position in the report output. When the fields are ordered to your satisfaction, click the Save button.
To delete a column from your custom report, click the Edit link to the right of the row. This opens the drop down interface again. Simply go to the field you want to delete and change the value to: (No Selection). Save your change and then click to Save your report.
Manually run the report for testing
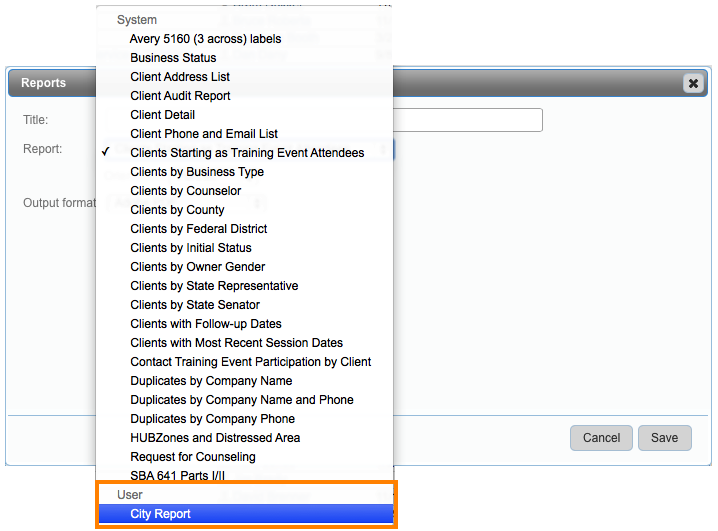
Your custom report has been created and you are ready to test your report to make sure that it can be imported into your third-party application. Go to view the data type for which you created the report. In other words, if you created a client report then go to View|Clients; If you created a counseling session report then go to Acvitity|Counseling; etc. Click Reports from the top right hand side of the screen and choose your custom report from the bottom of the drop down. All custom reports will be listed together below the system defined reports.
Once you have selected your report, next you will want to choose your output format. As noted above, you will probably want to export to either and Excel Export format or to the CSV format. But this is determined by your third-party application
.
Click Save to run your report. What you do next is dependent upon your third pary application to which you want to import your data. With the data file saved to your system you can now do a test import. If you need to make some changes to the export format, then you will want to go and edit the custom report by clicking Manage|Custom Reports and the clicking on the appropriate report. After making changes, it is strongly recommended that you test the export again for verification.
Setup report on scheduled basis
Once you are satisfied with the outcome of the custom report, and you want to export this data on a regular basis (either daily, weekly or monthly), then you may want to set up a scheduled report.
- Select Manage|Scheduled Reports from Neoserra's menu.
- Click the New button to create a scheduled report record.
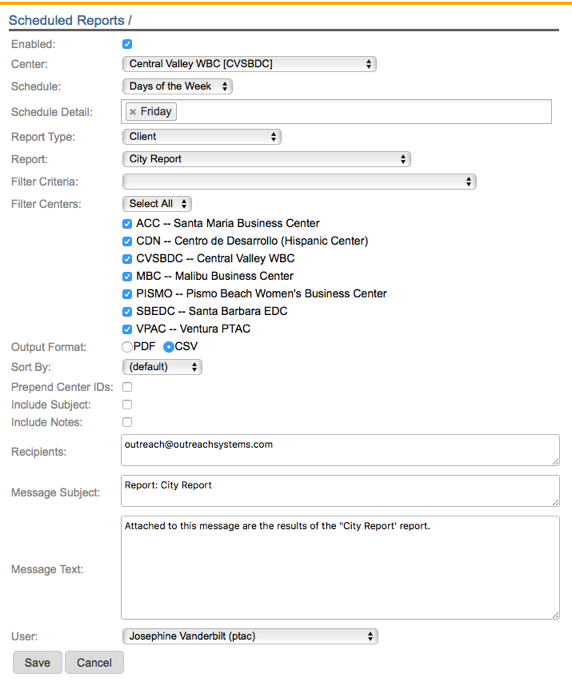
- If you are ready to enable your scheduled report upon setup then leave the Enabled? checkbox turned on. If you don't want to enable this report yet, then uncheck the box.
- The Center field identifies the center under which this report is being scheduled. It has no bearing on the data included in the report but it will determine the sender's email address that is used when the report is sent to the recipients of the scheduled report.
- Using the Schedule and Schedule Details fields in combination to schedule the report to recur on a daily, weekly or monthly basis.
- From the Report Type field's drop-down menu, select the type of report/scorecard you would like to schedule. From the Report field find your custom report at the bottom of the list.
- From the Filter Criteria field's drop-down menu, select from a list of built-in or saved filters to narrow down the records that will be included during report generation. Since you are exporting this data to another application you may only want to include newly entered data since the last export. If that is indeed the case, then you will want to use a filter that limits the data output. This is something you will need to determine based upon your specific export needs.
- Expand the Filter Centers heading to select and include records from centers other than your current active center.
- To the right of the Output Format field, select the CSV output format.
- From the Sort By field's drop-down list, select a sort order to apply to your report output, if applicable. The sort order options available differ depending on the type of report you selected.
- To prefix each record ID in your report output with its associated center ID, select the Prepend Center IDs? check box.
- Enter the email addresses (separated by semi-colons or commas) of the recipients who should receive the recurring report into the Recipients field.
- You can add Message Subject and Message Text if appropriate.
- Click Save to save your new scheduled report record.
Note: Scheduled reports and scorecards run in the early morning hours on the days you specify.
Once you have configured your new scheduled report and saved your settings, you will see three command options at the top of the screen: Run, Edit and Delete:

The "Run" command offers two options:
- View: This option allows you to see the report that the recipient were to receive if the report was sent right now. The report is not actually emailed to the recipient but rather is shown on the screen for review purposes.
- Email: This option allows you to manually send the report to the designated recipient(s). Again, this is probably only done for testing purposes, because going forward the report will run automatically, but this step will help ensure that you have entered a correct email address.
The "Edit" command allows you to make changes to the scheduled report settings as required; and the "Delete" option allows you to delete the report, assuming you have the necessary permissions.
Want more? Browse our extensive list of Neoserra FAQs.